Last updated: November 19, 2026
Print quality problems usually come from three things: the file, the printer settings, or the printer’s own maintenance state. Fix those three, and most “bad print” problems stop being mysteries.
This guide shows what to check first, what the common defects mean, and which maintenance habits keep pages looking clean.
What good print quality actually looks like
Good print quality means text, graphics, and photos come out with sharp edges, even color, and no repeat marks, streaks, or smudges. For a home or office printer, that starts with the right settings, the right paper, and a machine that is clean enough to move ink or toner the way it should.
Picture this: you hit print on a report and the text looks fuzzy, the logo has bands, and one page has a gray smear across the margin. You do not need random fixes. You need a short checklist that points at the right cause. That is what this section settles.
The first goal is clarity, not perfection. A printer that is clean, aligned, and using the right consumables should make text look crisp at normal viewing distance, with no visible streaks in plain areas.
- Text should have dark, even edges.
- Solid fills should look flat, not striped.
- Photos should show smooth transitions, not harsh lines.
- Pages should be dry or set when they finish, not tacky.
The truth is, a lot of “print quality” complaints are setup problems, not hardware failures. A glossy photo paper used with plain-paper settings can look dull. Draft mode can save ink, but it will also make text thinner and graphics lighter. On the other hand, a clogged nozzle, worn roller, or contaminated drum will make good settings look useless.
A clean print path matters just as much as a good file. Dust, paper fiber, dried ink, and toner spills all leave signatures on the page.
Why is my printer printing bad quality?
Bad print quality usually comes from mismatched settings, dirty parts, low or bad consumables, or worn components. The fastest fix is to identify the pattern of the defect before you change anything.
Picture this: you’re staring at a page with faded text, pale blocks of color, or repeated marks that appear at regular intervals. The error pattern tells you where the problem lives. That is better than guessing, and it saves paper fast.
Common causes show up in a few predictable ways:
-
Wrong paper setting
If the driver thinks you loaded plain paper but you actually loaded photo stock or labels, ink placement and drying can go wrong. -
Draft or economy mode
This reduces ink or toner use, but it can thin out text and make grayscale graphics look weak. -
Low ink, low toner, or poor-quality refill supplies
Running low often shows up first as faded bands, missing colors, or weak black text. -
Clogged nozzles or dirty heads
Inkjet printers can leave gaps in lines, missing colors, or streaks when nozzles dry up. -
Dirty rollers or feed path
This often causes smearing, skewed pages, or repeated marks. -
Worn drum, fuser, or transfer parts
Laser printers can show repeating spots, ghost images, or toner that rubs off.
A useful rule: if the defect repeats in the same place on every page, suspect a hardware path or rotating part. If the defect changes from page to page, suspect the file, the paper, or the driver. That is not a perfect rule, but it points you in the right direction.
What do streaks, smears, and faded pages mean?
Those defects usually map to a specific part of the print process, and that makes diagnosis much easier. Streaks point to contamination, fades point to supply or head problems, and smears point to drying or fusing trouble.
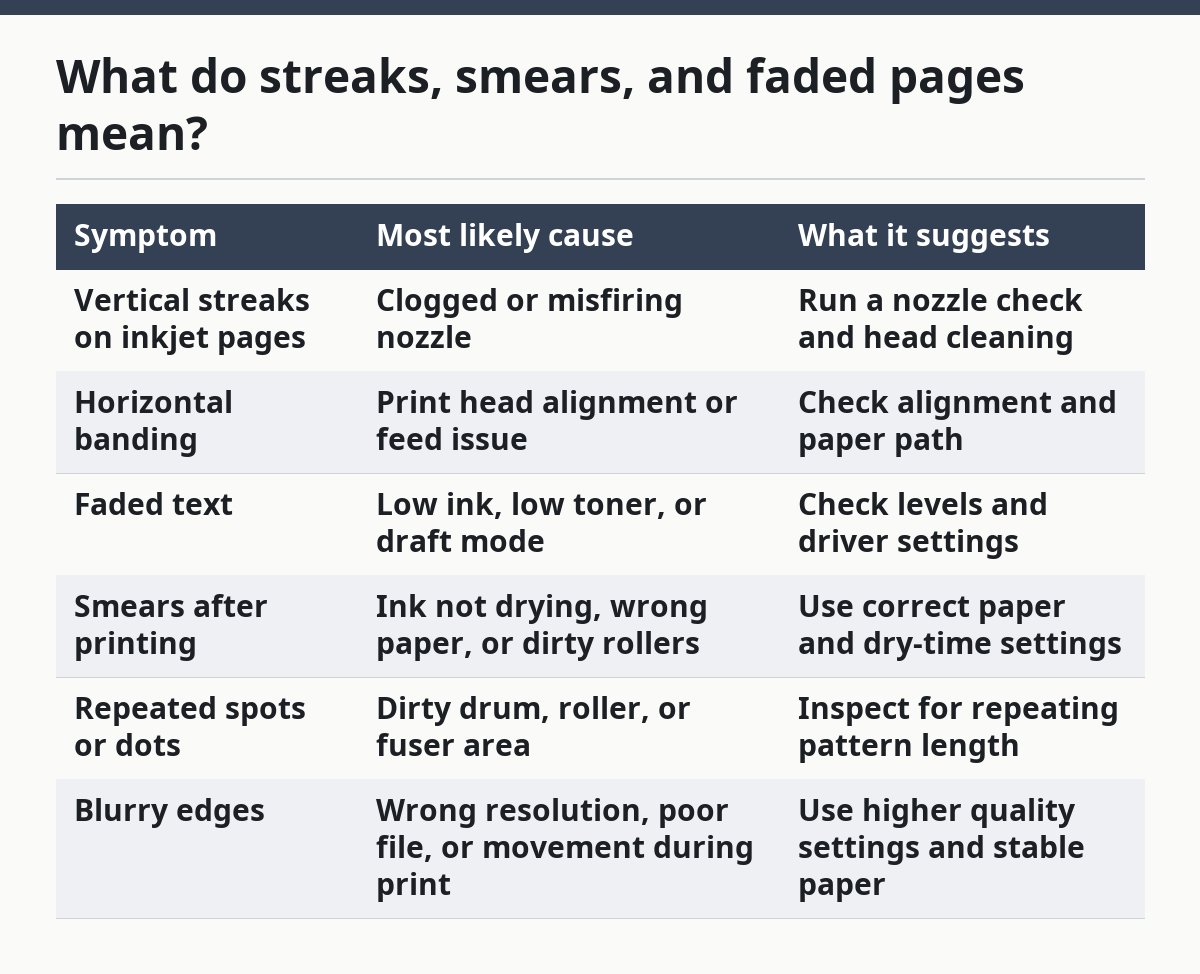
Picture this: you print a single-page letter and see one long vertical streak, or a gray blur near the bottom edge. Different defects tell different stories, and the shape of the mark is the clue. Here’s how to read it.
| Symptom | Most likely cause | What it suggests |
|---|---|---|
| Vertical streaks on inkjet pages | Clogged or misfiring nozzle | Run a nozzle check and head cleaning |
| Horizontal banding | Print head alignment or feed issue | Check alignment and paper path |
| Faded text | Low ink, low toner, or draft mode | Check levels and driver settings |
| Smears after printing | Ink not drying, wrong paper, or dirty rollers | Use correct paper and dry-time settings |
| Repeated spots or dots | Dirty drum, roller, or fuser area | Inspect for repeating pattern length |
| Blurry edges | Wrong resolution, poor file, or movement during print | Use higher quality settings and stable paper |
Laser and inkjet printers fail in different ways. Inkjet printers are more likely to show nozzle clogs, color gaps, and wet smears. Laser printers are more likely to show toner scatter, ghosting, and repeated defects tied to drum or fuser parts.
Here’s the catch: some defects look the same to the eye but come from different causes. A faded page can mean low toner, but it can also mean an energy-saving mode or a driver set to grayscale. That is why you check settings before swapping parts.
How do I improve print quality without replacing the printer?
You improve print quality by fixing settings, paper, alignment, and cleaning before you spend money on parts. In many cases, those steps are enough to restore sharp output.
Picture this: you open a document that should print cleanly, but the output looks soft or inconsistent. You do not need a new printer yet. You need a small, disciplined process that removes avoidable errors one by one.
Start here:
-
Use the right paper type setting
Match the driver to plain paper, photo paper, envelopes, or labels. The printer uses that setting to control ink or toner placement. -
Check print quality mode
Switch from draft or fast mode to standard or best quality when the job matters. -
Clean the print head or run nozzle check
Many inkjet drivers include a cleaning cycle and a test pattern. Use the test pattern to see whether nozzles are missing. -
Align the print head
If text or lines look doubled or offset, alignment can fix it. -
Inspect and clean feed rollers
Paper dust and coating residue can cause skew and smearing. -
Use better paper
Cheap paper can absorb ink unevenly and show fiber, curl, or bleed. -
Keep the printer in a stable room
Very dry air can dry ink nozzles. Damp paper can wrinkle and smear.
A lot of users jump straight to replacement cartridges. That is a mistake if the driver is still set to economy mode or the paper type is wrong. A brand-new cartridge will still print poorly if the rest of the setup is wrong.
The best part? These fixes are cheap in time and often free in money. A good maintenance routine beats a pile of spare cartridges sitting in a drawer.
What maintenance does a printer actually need?
A printer needs regular cleaning, sensible storage, correct consumables, and occasional part checks. The exact maintenance depends on whether it is an inkjet or a laser printer, but the basics are the same: keep dust out, keep paper dry, and stop wear from building up.
Picture this: your printer sits in a corner for weeks, then starts missing lines or leaving gray marks when you need it most. That is a maintenance problem, not a surprise. Machines that move paper and ink need attention even when they are not broken.
Inkjet maintenance
Inkjet printers need the print head kept clear and the ink path active. If the printer sits unused, nozzles can dry out and block.
- Print a small test page on a regular schedule.
- Keep the printer powered the way the maker recommends.
- Replace empty cartridges before they run dry for long periods.
- Wipe exterior dust, but do not soak internal parts.
- Use the printer’s built-in cleaning cycle only when needed, since repeated cleaning wastes ink.
Laser maintenance
Laser printers need a clean paper path, a healthy drum system, and care around toner dust. Toner is dry and fine, so it spreads easily if handled roughly.
- Clean paper dust from trays and rollers.
- Replace toner and drum parts before print defects become constant.
- Avoid touching the drum surface.
- Keep the printer closed when not in use to reduce dust.
- Use paper stored flat and dry.
A well-kept printer often lasts longer simply because its parts stay in their designed state. That does not mean every problem is preventable. Wear still happens. But routine care delays the expensive failures and keeps page quality stable.
Which printer type is easier to maintain?
Laser printers are usually easier to maintain for heavy text printing, while inkjet printers need more attention if they sit unused for long periods. That does not make one universally better. It means each machine has a different failure pattern.
Picture this: you print a few pages every month, or you print dozens of pages every day. The machine that stays happy in one setting may be annoying in the other. Maintenance burden should match your usage pattern, not just the sticker on the box.
Inkjet: best when color and photos matter
Inkjet printers usually handle color photos and mixed graphics well. They can make strong prints on the right paper, and many are compact.
Their weak points are maintenance related:
- Nozzles can clog if the printer sits idle.
- Ink can smear on the wrong paper.
- Low-cost cartridges can run out fast.
- Head cleaning can use a lot of ink if the printer is badly neglected.
Laser: best when clean text matters
Laser printers are strong for office documents and long text runs. Toner does not dry out like ink, so the “unused for weeks” problem is usually less painful.
Their weak points are different:
- Toner dust can mess with rollers and internal surfaces.
- Drum and fuser parts wear out.
- Color laser models can become expensive to service if multiple cartridges or drums age together.
- Warm-up and internal heat can affect some jobs.
If your main goal is crisp black text with predictable upkeep, laser often wins. If your main goal is rich color pages and photos, inkjet may be the better fit, but it asks for more regular attention.
How do I keep print quality stable over time?
You keep print quality stable by making maintenance boring and repeatable. That means the same paper habits, the same storage habits, and the same print checks after changes.
Picture this: one week the printer is perfect, and the next week the same file looks bad. That swing usually happens after a cartridge swap, a paper change, a long idle period, or a move to a different room. Stability comes from removing those variables.
Use this routine:
- Store paper in its wrapper until use.
- Keep the printer away from open windows, vents, and heavy dust.
- Print a test page after long idle periods.
- Check settings after driver updates or new software installs.
- Use genuine or known-good consumables when possible.
- Watch for repeated defect patterns before they become severe.
One overlooked cause is paper moisture. Paper that absorbs humidity can curl, feed badly, and dry unpredictably. That matters for both inkjet and laser jobs. A clean printer cannot fully compensate for bad paper.
Another overlooked cause is careless cartridge handling. Smudged contacts, shaken toner, or poor installation can create quality issues that look like mechanical failure. A few minutes of careful setup can save a lot of trial and error.
For deeper maintenance rules, follow the printer maker’s support pages and care instructions. HP’s printer support and Epson’s support pages both explain cleaning, alignment, and cartridge checks in model-specific terms. The same is true of Brother’s and Canon’s support libraries. If the printer manual gives a maintenance interval, that beats guesswork every time.
When should you stop troubleshooting and call it a hardware problem?
You should stop basic troubleshooting when the same defect returns after cleaning, alignment, and verified settings changes. At that point, the problem is probably a worn part, not a user mistake.
Picture this: you have already run the cleaning cycle, checked the paper, replaced the cartridge, and the page still shows the same repeating streak or faded band. That is the moment to stop burning paper and look at the part that is failing.
Signs that point to hardware:
- The same mark appears in the same place on every page.
- Cleaning cycles do not change the defect.
- A laser print rubs off easily after printing.
- An inkjet nozzle check still shows missing lines after cleaning.
- The printer makes odd noises, feeds crooked pages, or jams often.
At that stage, the likely fix may be a drum, fuser, roller kit, maintenance cartridge, or the printer itself. The exact part depends on the model. Some printers make part replacement easy; others make it costly enough that replacement is the smarter path.
A repair makes sense when the printer is still under warranty, the part is available, and the machine fits your needs. Replacement makes more sense when multiple wear parts are failing together or the cost of repair creeps too close to the cost of a new unit.
What should I do first if print quality drops today?
You should check settings, run a test page, and inspect the paper path before you replace anything. That order solves more problems than random part swapping.
Picture this: a deadline is near and the printer suddenly starts producing ugly pages. You need a short, repeatable triage plan, not a long guessing game. This one works.
-
Print a built-in test page.
This tells you whether the problem lives in the printer or the document. -
Check the driver settings.
Confirm paper type, color mode, resolution, and quality level. -
Look at the defect pattern.
Faded, streaked, smeared, or repeated marks each point somewhere different. -
Run the printer’s cleaning or alignment tools.
Use them once, then retest. -
Inspect paper and cartridges or toner.
Look for damp paper, low supply, poor installation, or visible residue. -
Decide whether the part is worn.
If the same defect keeps coming back, the printer likely needs a service part or replacement.
That sequence is simple for a reason. It separates settings issues from real hardware wear fast, and it keeps you from wasting time on fixes that cannot help.
Key Takeaways
- Good print quality depends on three things working together: file, settings, and clean hardware.
- The shape of the defect tells you a lot; streaks, smears, and faded text usually have different causes.
- Inkjet printers need nozzle care and regular use, while laser printers need clean rollers and healthy wear parts.
- Paper choice matters more than most people think.
- If cleaning and alignment do not change the defect, stop chasing settings and inspect for worn parts.
FAQ
Why does my printer print faded text?
Faded text usually means low ink or toner, draft mode, or a driver setting that is not matched to the job. Start by checking the print quality mode and the consumable level, then print a test page to see whether the problem is in the document or the machine.
Why are there streaks on my printed pages?
Streaks usually come from clogged nozzles, dirty rollers, or a worn part in the print path. Vertical streaks on an inkjet often point to a nozzle issue, while repeated marks on a laser printer can point to a drum or fuser-related problem.
How often should I clean my printer?
Clean it when the printer shows symptoms, not on a random calendar alone. A light cleaning schedule makes sense for dusty rooms or printers that sit unused, but repeated deep cleaning can waste ink or toner and does not fix worn parts.
Does paper quality really affect print quality?
Yes, paper quality changes how ink lands, how toner bonds, and how the page feeds. Cheap or damp paper can curl, smear, bleed, or feed unevenly, even if the printer itself is working properly.
When is it time to replace the printer instead of repairing it?
Replace it when the same defect keeps returning after cleaning, alignment, and fresh consumables, or when several wear parts are failing at once. If the repair part is hard to get or the machine no longer fits your print needs, replacement is usually the cleaner choice.
Drafted with AI; not yet reviewed by a person.