Last updated: November 19, 2026
Quick Answer: 3 settings usually decide whether Google Docs prints without layout changes: page size, margins, and scaling. Google Docs printouts shift when the browser, page setup, or printer settings fight each other. The fix is to lock the document’s page setup, use Print preview, and match the browser’s print dialog to the same paper size and margins. The steps below show how to keep the layout steady when you print from Google Docs.
Key Takeaways
- Set the page size, margins, and orientation in Google Docs before you print.
- Use Print preview in Docs, then check the browser’s print dialog for scaling.
- Keep headers, footers, and images inside the page bounds so they don’t reflow.
- If the preview already looks wrong, the problem is in the document, not the printer.
- Match the paper size in Docs and the browser, or the page can shift.
Why Google Docs changes the layout at print time
Google Docs changes the layout when the browser or printer asks for a different page model than the document uses. Picture this: you’ve finished a one-page handout, and the printout suddenly wraps lines, clips a header, or pushes an image to page two. The fix starts before the printer ever sees the file.
Google Docs lays out the page using its own settings first, then hands that layout to the browser’s print dialog. If the browser switches paper size, scaling, or margins, the page can reflow. That is why a document that looks fine on screen can still print differently.
The main trouble spots are page size, margins, orientation, headers and footers, and scaling. If one of those changes between Docs and the browser, the page can drift by a few millimeters and the whole line break pattern can move.
- Docs controls the document design.
- The browser controls the final print handoff.
- The printer usually follows the instructions it gets.
Read this before you print
If the file already looks wrong in Docs, fix the document first. If it looks right in Docs but wrong in print preview, the browser settings are the problem. If preview looks right and paper still comes out shifted, check the printer driver for its own scaling or paper size setting.
How do I print from Google Docs without layout changes?
You print from Google Docs without layout changes by matching the document setup to the browser print settings before you hit Print. Picture this: you’re trying to keep a resume, class handout, or invoice exactly where it is on the page, and you only want the paper copy to match the screen. That takes a short sequence, not guesswork.
- Open Google Docs and load the document you want to print.
- Check File > Page setup and confirm the paper size, orientation, and margins.
- Review the page in the document view and make sure text, images, and headings stay inside the margin lines.
- Choose File > Print to open Google Docs Print preview.
- Set the browser dialog to the same paper size and turn off any scaling that changes the page fit.
- Print the first page and compare it with the preview before you print the rest.
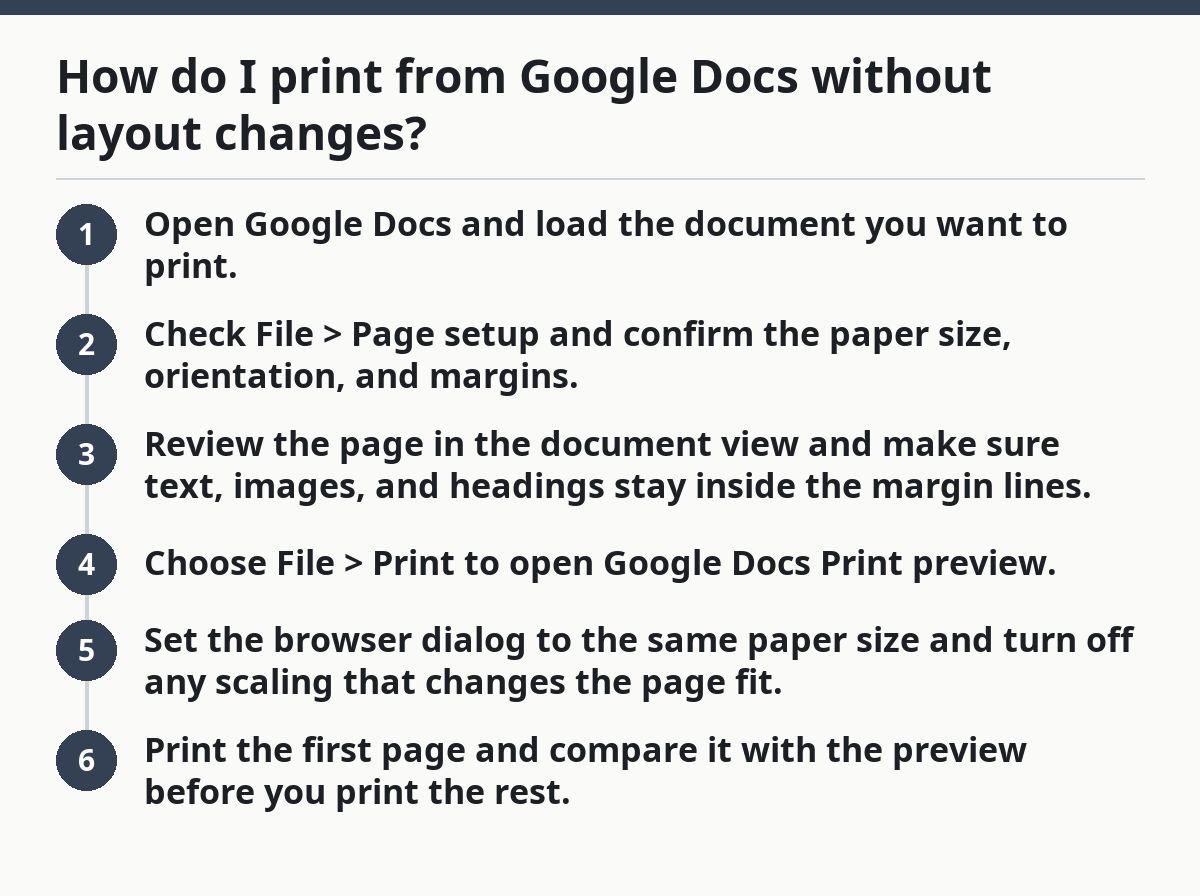
That process sounds plain, but it solves the usual layout drift. The key is to keep the same paper size in both places, such as Letter or A4, and avoid an automatic fit-to-page setting unless you actually want shrinkage. If the browser says 100% or Actual size, that is often the safest choice when the document already fits the page.
- Page setup in Docs comes first.
- Print preview comes second.
- Browser scaling comes last.
Set page setup first so the document stays fixed
You set page setup first because it is the anchor for the whole page. Picture this: your document was built for Letter paper, but the browser thinks the printer is using A4. That tiny mismatch can move every line, and the last paragraph may jump to a new page.
In Google Docs, open File > Page setup and check three things: paper size, orientation, and margins. If you are printing a standard letter-sized document in the U.S., Letter is often the safe choice. If the paper in the tray is A4, use A4 in Docs too. Do not leave the setting vague and hope the printer sorts it out.
Margins matter just as much. A document with narrow margins can look fine on screen and still clip when a printer adds its own non-printable edge. If your content hugs the page edge, give it more room before printing. A margin change of even a small amount can move a heading, image, or footer.
A quick margin check
Look for text near the top, bottom, and sides of the page. If a line sits too close to the edge, it may shift when the document is printed. Move that content inward in Docs instead of trusting the print dialog to preserve it.
- Use the same paper size in Docs and the tray.
- Keep margins consistent across the document.
- Avoid last-minute orientation flips unless the page truly needs landscape.
What should I check in Google Docs Print preview?
You should check that Print preview shows the same page break, image position, and header spacing you see in the document. Picture this: the screen shows a clean two-page report, but the preview adds a third page or cuts a footer line in half. That preview is the warning sign, not the printer.
Google Docs Print preview is the first place to catch drift. Open it from File > Print and look at the page count, spacing, and any lines that have moved. If the preview already changed the layout, stop there. The browser did not cause the problem by itself; it exposed one that already existed.
Pay special attention to headers and footers. A header that is too tall can push the body text down. A footer with a page number, date, or note can take more room than you expected. If those elements are close to the page edge, they can force a reflow.
Things to look for in preview
- A heading that moved to the next page.
- An image that no longer sits beside the paragraph it belongs to.
- A footer that now crowds the last line of text.
- A page count that changed after the dialog opened.
If any of those show up, go back to Docs and edit the layout before printing. Do not try to rescue a broken preview with random browser clicks. That usually makes the result less predictable, not more.
How do browser print dialog settings cause layout drift?
Browser print settings cause layout drift when they resize the page, add their own margins, or ignore the paper size in Google Docs. Picture this: the document looks correct in Docs Print preview, but the browser dialog adds “Fit to page” or a different tray size and the page shifts anyway. That is a browser problem, not a writing problem.
Check the print dialog that appears after Docs hands off the file. The most common setting to watch is scaling. If the browser tries to shrink content to fit more on the page, the whole layout can rewrap. That is useful for some jobs, but not for documents that must stay fixed.
Also check the destination printer and its paper size. A printer set to Letter can still receive an A4 job, and the browser may try to compensate. That compensation can change line breaks, image spacing, and the placement of headers and footers. Keep the browser and Docs in agreement.
A small settings list that matters
- Scaling: leave it at 100% or Actual size unless you need resizing.
- Paper size: match the paper in Docs.
- Margins: use the same margin logic as the document.
- Headers and footers: avoid browser-added extras if you do not need them.
If the browser offers preview thumbnails, compare them to the Docs preview. A one-line difference there can become a full-page shift on paper. The cleanest print job is the one that changes as little as possible between screens.
How to keep images, headers, and footers from moving
You keep images, headers, and footers from moving by anchoring them inside the page’s usable area and avoiding tight fits. Picture this: you placed a chart beside a paragraph, but the printed copy pushes the chart below the text and leaves a blank gap above it. That is layout drift caused by content that has no room to breathe.
Images are the easiest thing to shove out of place. If an image sits too wide for the remaining line space, Google Docs may move it to the next line or next page. Shrink the image a little, move it above or below the paragraph, or give it a cleaner break. Wrapping style matters too.
Headers and footers need space of their own. If they contain too much text, they can crowd the body. Keep them short, and do not pack them with extra lines unless the design truly needs it. A dense footer is a common cause of the last paragraph jumping to another page.
Use these practical fixes
- Pull images away from the page edge.
- Avoid stacking too many elements in one corner.
- Shorten headers and footers when the page is tight.
- Recheck page breaks after every edit.
If a document must stay exact, simplify it. A clean page with fewer floating parts is much less likely to shift than a crowded one. That is especially true for forms, handouts, and reports that need tight spacing control.
When the printer is not the real problem
The printer is not the real problem when the layout already changes before the paper comes out. Picture this: you printed the same document from a different printer and got the same bad spacing. That means the document or browser settings are carrying the error, not the machine on the desk.
This matters because people often blame the printer driver first. In many cases, the actual cause is a mismatch between Docs page setup, the browser print dialog, and the paper size in the tray. The printer just obeys what it receives. If three settings disagree, the final sheet usually loses.
You can spot that mismatch fast. If the preview is wrong, fix the document. If the preview is right but the browser changes the page, fix the dialog. If both look right but the paper still comes out wrong, check the printer’s own size and scaling controls. The order matters.
A clean troubleshooting order
- Check Google Docs page setup.
- Check Google Docs Print preview.
- Check the browser dialog.
- Check the printer driver settings.
That order saves time because it starts where the layout is created. If you jump straight to the printer, you may waste ten minutes chasing a paper problem that was really a page-setting problem.
Where this fits in the larger printing workflow
This fix belongs in the larger workflow for document output control. Picture this: you want the same file to print the same way every time, across laptops, browsers, and printers. That is the job of the workflow, not just the printer button.
Google Docs printing is one part of a larger chain: document setup, preview, browser handoff, and paper output. If any one link changes, the page can move. Keep that chain tight and the document will stay steady. For a broader look at page behavior, see the Google Docs help center and the Google Docs Editor Help page. For related workflow guidance, you can also review page setup in Google Docs, Google Docs page breaks, and printing documents.
The best habit is to compare the document setup with the preview and the browser dialog before every print job. It usually takes under a minute, and it catches the errors that cause most layout changes.
Final rule
If you want the page to stay still, make the page settings match before you print.
Why does Google Docs print differently than it looks on screen?
Google Docs prints differently than it looks on screen when the page setup, browser dialog, or printer paper size does not match the document. The screen view can hide those mismatches until print preview redraws the page. If the preview changes, the problem is in the layout settings, not the printer itself.
How do I keep images from moving when I print a document?
You keep images from moving by giving them enough room inside the margins and avoiding tight page edges. If an image is too wide for the remaining line space, Google Docs may move it to a new line or page. Shrink the image slightly or move it to a cleaner spot before printing.
Drafted with AI; not yet reviewed by a person.