Last updated: November 19, 2026
Quick answer: in most cases, you fix how to fix color shifts in photo prints by correcting one thing at a time, starting with the ICC profile and the printer driver. If the image file, paper profile, and driver are not aligned, the print can shift by a visible amount even when the photo looks fine on screen. Start by checking the embedded color profile, then match the correct ICC profile for the photo paper, and turn off duplicate color correction in the driver. If the print still shifts after that, the problem is likely in the printer setup, not the photo.
Key takeaways
- Color shifts often begin when two parts of the chain both try to manage color.
- A practical first fix is to match the paper profile to the exact photo paper and let only one system control color.
- A monitor that looks too bright can make prints seem too dark or too warm, even when the printer is working as expected.
- The right driver setting depends on the printer model and paper type, so one preset is not enough.
- If the same shift shows up across multiple papers and print settings, the printer itself may need service.
What is causing the color shift?
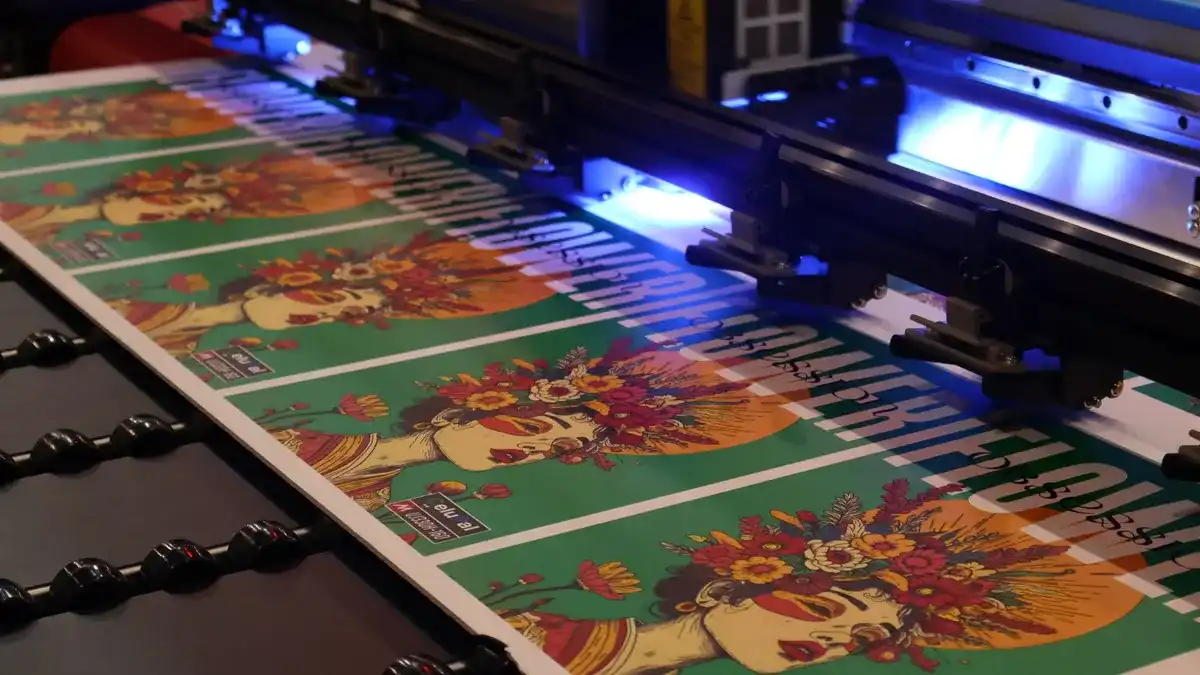
Color shift in photo prints is usually caused by a mismatch in the print path, not by the image alone. That mismatch can come from the monitor, the embedded color profile, the ICC profile for the paper, or the printer driver deciding to “help” with its own color control.
The most common version is simple: the file is tagged one way, the printer expects another, and the driver adds a second correction. A warm skin tone can turn orange, a neutral gray can go green, or blues can lean purple. In practical terms, the cause is usually one of three things: the wrong paper profile, the wrong print settings, or a monitor that is not showing a realistic preview.
Because of that, the fastest fix is often not to edit the photo first. It is to check the output path from screen to paper. If that path is wrong, the same image can print differently on two sheets of the same photo paper.
A useful reference point is Adobe’s color management guidance for Photoshop and other apps, which explains why profile mismatches change output. The ICC specification is the standard behind paper profiles and printer profiles, so the terms matter here. The goal is not perfect theory; it is getting the printed color back in line. Adobe’s documentation is here: https://helpx.adobe.com/creative-cloud/help/color-management.html, and the ICC standard is here: https://www.color.org/.
How do I fix photo print color shift step by step?
Start with the smallest change and move outward only if the first fix fails.
-
Check the image’s embedded color profile. Open the file and confirm it has a profile attached, such as sRGB or Adobe RGB. If the file is untagged, the printer software has to guess, and guessing often causes a visible shift.
-
Pick the exact paper profile for the photo paper. Match the ICC profile to the paper brand, surface, and printer model. Glossy, luster, and matte papers do not behave the same way, so a generic profile can push color away from the original.
-
Set color control in one place only. In the printer driver, turn off driver color correction if the app is managing color. If the driver is managing color, do not also let the app apply its own correction. Two controllers mean two changes, and that is where many bad prints start.
-
Match the print settings to the paper. Choose the correct media type in the printer driver, such as glossy photo paper or matte photo paper. The media type changes how ink lands, how much ink the paper accepts, and how the driver builds the print.
-
Check the monitor mismatch. If the screen is much brighter or cooler than the print, the print will look wrong even when it is not. A bright monitor often makes the print seem too dark; a cool display often makes the print seem too warm.
-
Print one small test image before a full run. Use the same paper, the same driver setting, and the same file. A small test saves time and paper, and it tells you which change fixed the shift.
-
If the shift stays the same across different files and papers, stop and inspect the printer path. At that point the problem may be a bad driver, a stale profile, clogged nozzles, or a printer that needs maintenance.
That order matters because it starts with settings you can change in 2 minutes and ends with the parts that may need more effort. It also keeps you from chasing the monitor when the real problem is the paper profile.
Which setting should control color?
Only one system should control color, and that choice depends on the software and driver you are using. If both the printer driver and the app try to manage color at the same time, the print often shifts warm, cool, or muddy.
| Color control choice | Best use case | Main risk | What to check |
|---|---|---|---|
| App controls color | You know the embedded profile and have the right ICC profile for the paper | Driver may apply a second correction if not disabled | Driver color management must be off |
| Driver controls color | Simple print setup with the printer’s own presets | The app may still apply its own correction | App color management must be off |
| Automatic/default control | Quick printing with no profile work | Least predictable for photo prints | Expect more color shift on specialty papers |
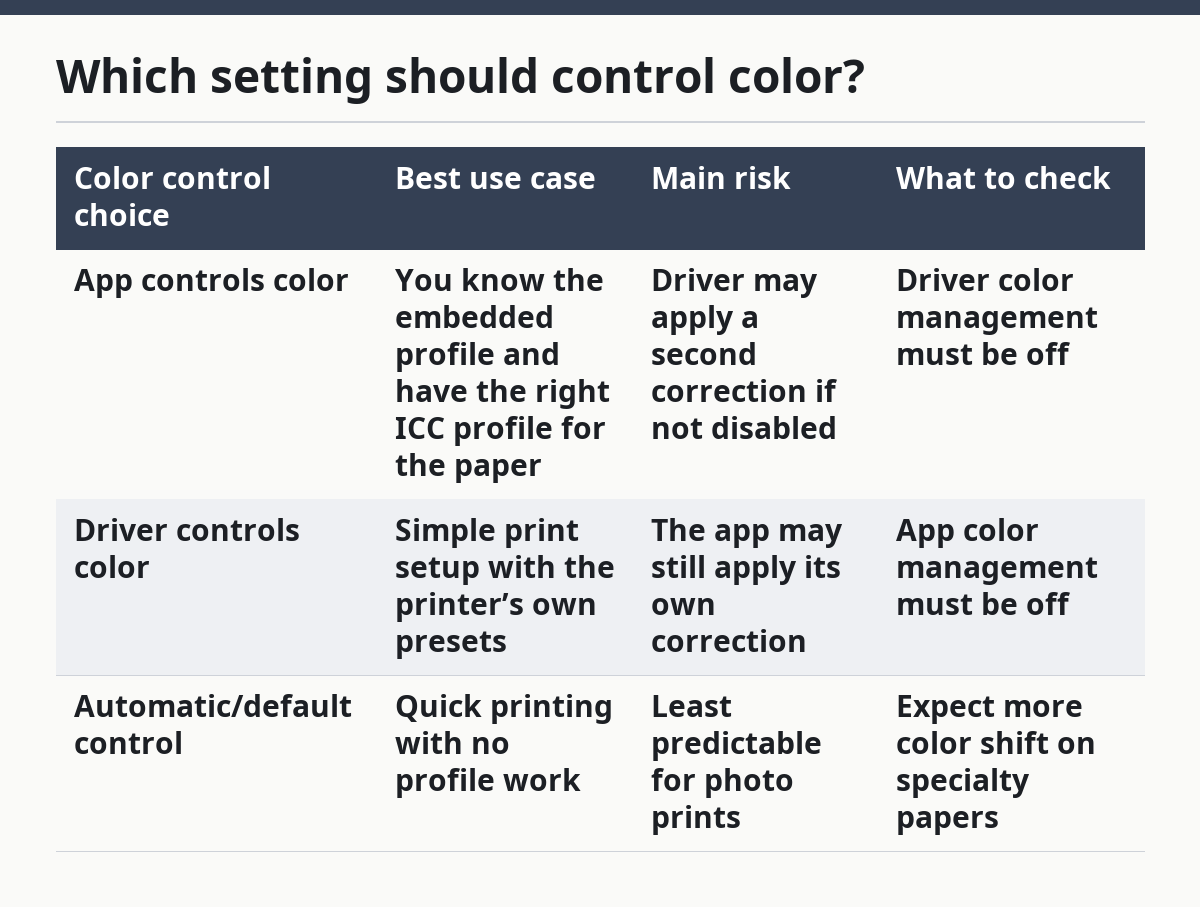
The mistake most people make is assuming “default” means neutral. On photo paper, default often means the driver is applying its own rendering choice. That may be fine for a casual snapshot, but it is a weak choice for prints where skin tone, neutral grays, or product color matter.
A good rule is this: if you select an ICC profile in the app, disable driver color control. If the driver offers a photo preset that manages color, keep the app from doing the same thing. The exact labels vary by printer model, but the logic stays the same.
This is also where the embedded color profile matters. A file with no profile, or the wrong one, can make every later step harder. The printer cannot correct what the software has already interpreted badly.
How does paper profile affect the result?
The paper profile decides how a specific photo paper should translate color, and that makes it one of the biggest causes of color shifts. A glossy paper, a luster paper, and a matte paper do not react the same way to the same ink load.
That is why a print can look fine on one sheet and wrong on another, even with the same photo and the same driver settings. The issue is not that the image changed. The paper surface changed the way the ink looks once it dries.
A paper profile matters most when the print is close to neutral. Grays, whites, and skin tones show the error first. A profile that is slightly off can make a white shirt look cream, make shadows pick up a color cast, or make a portrait look too pink or too green.
If the paper brand offers a profile for your printer model, use that before trying to “fix” the photo in the editor. Editing around a bad profile usually makes the next print worse on a different paper. If the paper is not made for your printer or if the profile is missing, the result will be less predictable.
Why does the screen look right but the print does not?
The screen can look right while the print is still wrong because the monitor and printer are not speaking the same color language. A bright monitor is the biggest trap. It makes the image look lighter and cleaner than the paper can reproduce, so the print comes out darker or flatter than expected.
This mismatch is not always a calibration issue in the full technical sense. Sometimes it is just a brightness problem, a warm display preset, or a display that is far brighter than the printer output. A reader may think the photo is underexposed, then darken it, and the next print turns muddy.
A practical check is to view the image next to a known good print under similar light. If the screen still looks much brighter, the monitor is the likely culprit. If the print looks wrong under a very warm lamp but better near daylight, the viewing light is part of the mismatch too.
This is the point where a lot of advice goes too far. Fixing monitor mismatch can help, but it does not replace proper printer settings. If the paper profile and driver settings are wrong, a better monitor will only make the mismatch easier to see.
What mistakes make color shifts worse?
The biggest mistakes are the ones that stack corrections on top of each other. A photo print color shift often gets worse after a “fix” because the user changes the file, the app, and the driver all at once.
One common mistake is printing with the wrong media type, such as using a plain paper setting on photo paper. That changes how the printer lays down ink and can leave prints dull, oversaturated, or blotchy. Another is using a profile for the wrong paper surface. Glossy and matte are not interchangeable, even when the brand name is the same.
A third mistake is editing the image to match a bad print instead of fixing the print path. That can help one copy and ruin the next one on a different paper. If the problem is in the driver, the image file is not the place to solve it.
The honest downside here is that there is no single universal setting that fixes every printer. Printer model, driver version, paper type, and app all matter. That means some trial and error is normal, but the trial should be controlled: one change at a time, same file, same paper, same light.
When should you stop adjusting and get help?
Stop adjusting after the same color shift appears on multiple files, multiple sheets, and multiple correct settings. At that point, the issue is likely outside simple troubleshooting.
If you have matched the ICC profile, checked the embedded color profile, disabled duplicate color control, and selected the correct paper type, but the print still shows the same cast, the printer may need maintenance. Driver problems can also linger after an update, especially if the software has an older profile list or a preset that ignores your choice.
A second sign is a shift that changes across the page, not just from print to print. That can point to a nozzle issue, ink delivery problem, or another hardware fault. A software fix will not solve that.
For readers who want the broader maintenance side, the print quality and maintenance hub covers the related steps that sit around this problem. This page stays focused on color shift, so the next step is to separate settings issues from printer maintenance issues.
Why do my prints look different from my screen?
Because the screen and the printer do not produce color the same way, and the screen is often much brighter. A monitor can show color and brightness that paper cannot match, so the print may look darker, warmer, or flatter even when the file is fine.
The first things to check are the embedded color profile, the ICC profile for the photo paper, and the printer driver’s color control. If the app and driver both manage color, the print can shift even more.
How do I stop prints from looking too warm or too cool?
Match the paper profile, then make sure only one place is controlling color. A warm cast often comes from the wrong ICC profile, the wrong media type, or the driver adding its own correction on top of the app.
If the screen is also very warm or very cool, the monitor can mislead you into making the file worse. Keep the test simple: one photo, one paper, one driver preset, and one color-management path. The simpler the setup, the easier it is to see whether the color shift comes from the monitor or the print path.
Adobe’s color management help pages and the ICC standard are the right references for the terms used here, and both explain why profile matching matters. Canon’s printing support pages also explain how media type and driver settings affect output: https://www.canon-europe.com/support/, and Epson’s support pages cover the same basic setup logic for photo paper profiles: https://epson.com/support.
FAQ
What is the quickest way to fix a color shift in photo prints?
The quickest reliable fix is to use the correct ICC profile and make sure only one place controls color. In practice, that means matching the paper profile to the paper and turning off duplicate driver correction.
Should I edit the photo before I fix print settings?
Usually no. If the profile, media type, or driver setting is wrong, editing the image often makes the next print harder to correct.
Why does the same photo look different on glossy and matte paper?
Glossy and matte paper absorb and reflect ink differently. That changes how the same file looks after printing, even when the printer and image are unchanged.
How can I tell whether the monitor or the printer is the problem?
Compare the print to the screen under similar light. If the screen is much brighter than the print, the monitor may be part of the problem; if the same cast appears across different files and settings, the printer path is more likely at fault.
When should I get the printer serviced?
If the color shift stays the same after the correct profile, driver setting, and media type are all confirmed, the printer may need service. A page-wide shift or repeated banding can also point to hardware trouble.
Drafted with AI; not yet reviewed by a person.