Last updated: November 19, 2026
Vertical banding usually comes from a nozzle, alignment, paper-feed, or driver problem, and the first check should be a nozzle check or built-in test pattern before you change anything else. If the bands show up in the test pattern, start with the printer’s own maintenance tools; if they do not, look at the driver, the paper path, and the rollers.
Key takeaways
- Start with a nozzle check or built-in test page, because that tells you whether the printer itself is making the problem.
- On an inkjet printer, cleaning and alignment usually help more than random settings changes.
- On a laser printer, banding often points to the paper path, toner, drum, or rollers rather than clogged nozzles.
- Driver settings can cause banding even when the hardware is fine, especially if a draft mode is on.
- If the pattern stays the same after the basic checks, the issue may need service instead of another cleaning cycle.
What is vertical banding in printer output?
Vertical banding is light or dark stripes that run up and down the page, and it usually means the printer is laying down ink or toner unevenly across the page width. People often call it “vertical lines,” but the pattern is different from a single scratch line or a one-off smear.
On an inkjet printer, banding often points to missed nozzles, a weak printhead pattern, or printhead misalignment. On a laser printer, the cause is more likely tied to toner flow, the drum, transfer parts, or paper feed rollers. That difference matters, because the wrong fix wastes time and can make the print quality worse.
The quickest way to sort it out is to print the printer’s built-in diagnostic page. If the banding shows up there, the fault is inside the printer or in its setup. If the diagnostic page looks clean but a document from your computer has bands, the driver or app settings are the more likely problem. Many printer makers describe this same split in their support guides, including HP Support and Canon’s print quality troubleshooting pages.
A reader who only wants the shortest path can think in this order: test page first, maintenance second, settings third, paper path last. That order matters because a bad setting can look like a bad printhead, and a dirty roller can look like a bad cartridge.
How do I fix vertical banding step by step?
Fix vertical banding by starting with the printer’s own test, then cleaning, then alignment, then the driver, and only then the paper path. The goal is to change one thing at a time so you know which step helped.
- Print a nozzle check or test pattern. Use the printer’s menu or utility, not a random file from your computer. If the banding appears on that pattern, the printer itself is involved. If the pattern is clean, move to the computer settings.
- Run one cleaning cycle. Use the printer’s maintenance menu and choose the normal cleaning option first, not the deepest one. A cleaning cycle is meant to clear blocked nozzles or uneven ink flow, and one pass is enough to tell you whether the problem is responding.
- Print the test pattern again. If the bands are lighter or gone, stop there and print a few ordinary pages. If the pattern is unchanged, move on instead of repeating cleanings over and over.
- Run printhead or head alignment. Choose the printer’s alignment tool and let it print the alignment sheet if it asks for one. Misalignment can leave visible vertical bands even when the nozzles are open.
- Check the driver settings. Open the print dialog and look for draft, economy, fast mode, or photo/text presets that change ink or toner placement. Switch to a normal quality setting and print the same page again.
- Try a different paper type setting. Match the driver to the paper loaded in the tray, such as plain paper or photo paper. A mismatch can change how the printer feeds or lays down ink.
- Inspect the paper feed rollers. Look for dust, paper lint, or shiny worn spots on the rollers. If the printer’s manual allows it, clean them with the method it recommends, then test again.
- Try another stack of paper. Use fresh, flat sheets from a reclosed ream. Warped or damp paper can feed unevenly and show up as repeating bands.
- Print a second test page from a different app. Use a simple text page or a PDF. If one app bands and another does not, the problem is in the software path, not the printer engine.
- Stop and get service if the banding survives all of the above. A worn printhead, drum, transfer part, or other internal component may need replacement.
That order works for both inkjet printer and laser printer problems, but the early steps matter more on inkjet. A laser printer with a strong repeating band after a fresh toner cartridge can point to a drum or transfer issue, while an inkjet with broken bands on the nozzle check usually points back to the printhead.
Should I clean the printhead or change settings first?

Change the setting first if the banding appears only from your computer, and clean the printhead first if the banding appears on the printer’s own nozzle check. That split saves time and keeps you from cleaning a printhead that is not the real problem.
A driver setting can create banding by using draft mode, economy mode, or a preset that reduces ink density. That kind of problem often shows up on every page from one computer and disappears when you print the same file from a different computer or with another profile. In that case, a cleaning cycle will not help much.
A printhead issue behaves differently. The nozzle check pattern will show missing lines, broken bands, or uneven gaps even before you print a document. If that is what you see, a cleaning cycle is the right first move, followed by alignment. Most printer makers recommend using their maintenance tools before more aggressive steps, and that is sound advice because repeated cleanings can waste ink and still leave the root cause in place.
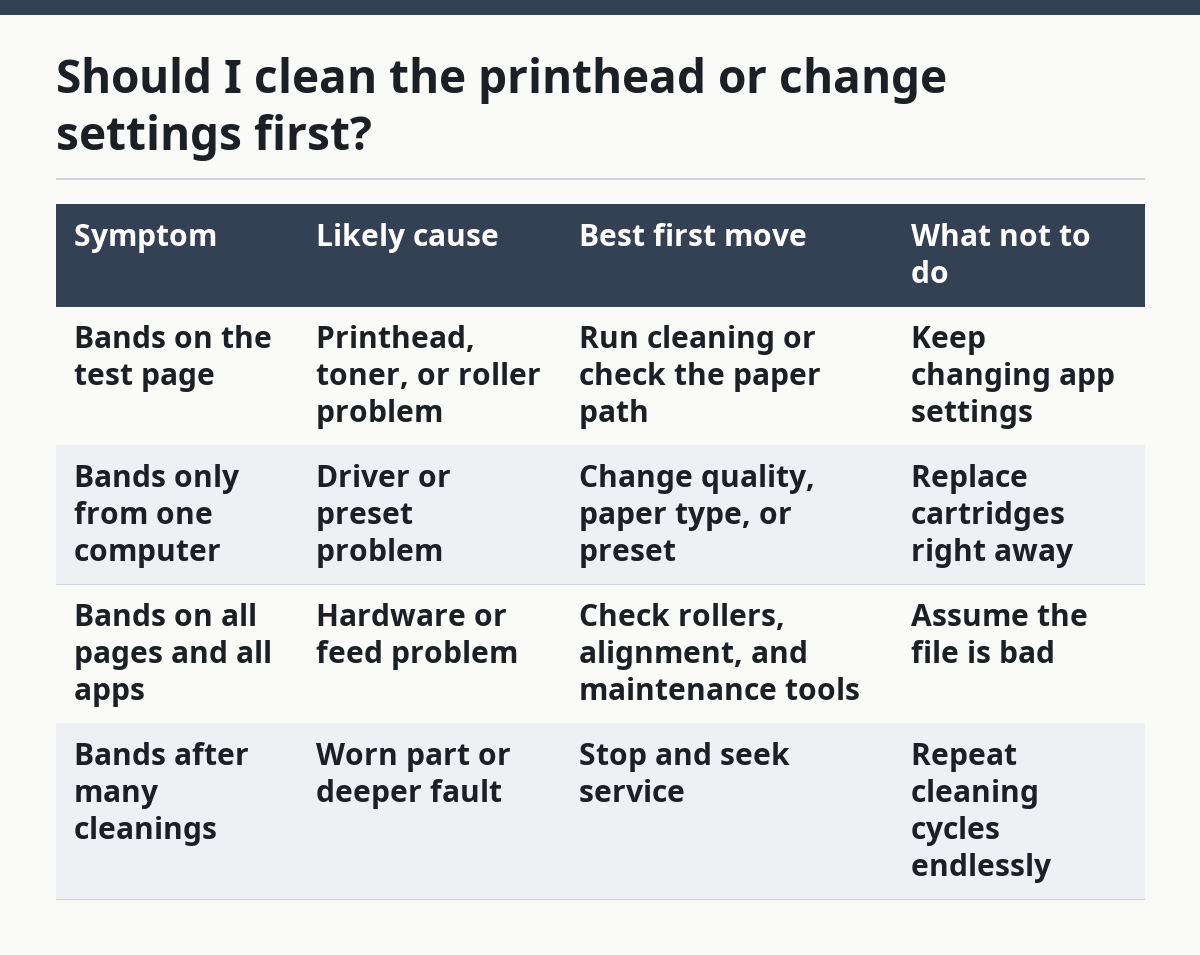
Here is the short comparison:
| Symptom | Likely cause | Best first move | What not to do |
|---|---|---|---|
| Bands on the test page | Printhead, toner, or roller problem | Run cleaning or check the paper path | Keep changing app settings |
| Bands only from one computer | Driver or preset problem | Change quality, paper type, or preset | Replace cartridges right away |
| Bands on all pages and all apps | Hardware or feed problem | Check rollers, alignment, and maintenance tools | Assume the file is bad |
| Bands after many cleanings | Worn part or deeper fault | Stop and seek service | Repeat cleaning cycles endlessly |
This is also where an honest limit matters. If the printer is already showing poor output after several maintenance cycles, the fix may not be in software at all. At that point, more cleaning can cost ink or toner without solving the print quality issue.
What paper feed rollers have to do with banding
Paper feed rollers can cause vertical banding when they slip, glaze, or pick up dust, because uneven paper movement changes how the page passes through the printer. That is more common in a laser printer, but an inkjet printer can show a similar pattern if the paper does not feed smoothly.
A roller issue usually leaves clues. Pages may start a little crooked, feed at different speeds, or show repeat marks at regular intervals. The printer may also pull more than one sheet, hesitate before feeding, or make a rough sound near the tray. Those signs point away from the printhead and toward the paper path.
If the printer manual gives a roller-cleaning method, use that method and nothing more aggressive. Some rollers are easy to reach and some are not, and forcing them with the wrong cloth or liquid can damage the surface. If the manual does not explain cleaning the rollers, that is a sign to stop and use the maintenance tools or service support instead of improvising.
Paper choice matters here too. A 24 lb or 28 lb sheet is not the point; the real issue is whether the paper is flat, dry, and suitable for the printer. Damp or curled paper can slip or skew, and then the print comes out with bands that look like a toner problem. Fresh paper from a sealed ream is a better test than a stack that has sat open for months.
When is it the printer driver?
It is the printer driver when the banding changes with settings, apps, or computers, but the printer’s own test page looks normal. That is the clearest sign that the hardware is not the only thing involved.
Driver-related banding often comes from one of three places: a draft preset, a wrong paper type, or a mismatch between the app and the printer’s quality setting. A document sent from a PDF reader can look different from the same file sent from a photo app, even if the printer never changed. That is why the built-in test page matters so much.
If you suspect the driver, use a plain document and a normal quality setting first. Then change only one setting at a time. If the bands disappear when you switch from draft to normal, the fix is simple: keep the better quality preset for that job type. If the bands stay, the problem is likely not the driver alone.
A full driver reinstall is sometimes suggested online, but that is not the first move. It takes more time than changing the print dialog, and it does not help if the real cause is a clogged nozzle or a worn roller. Start with the settings you can see, then move to the driver only if the pattern points there.
When should I stop troubleshooting and get help?
You should stop troubleshooting when the banding stays after a nozzle check, one cleaning cycle, alignment, driver checks, and a paper path check. At that point, the printer may need a part replaced rather than another round of settings changes.
This is the point where a printhead can be worn out, a drum can be failing, or the transfer path can be off enough that normal maintenance does not fix it. On some printers, especially older models, repeated cleaning can use a lot of ink or toner without improving the page. On others, the next step is a replacement cartridge or maintenance kit, but only if the printer design uses those parts.
If the printer is under warranty or the bands are appearing on every page type, the sensible move is to contact the maker or a repair shop with the test page in hand. The nozzle check or diagnostic sheet gives them something concrete to inspect, and it tells them whether the fault is in the hardware or the computer path. That saves time compared with describing “bad print quality” in general terms.
For broader print-quality issues, the hub page on print quality and maintenance is the right place to start, but this page stays focused on vertical banding and the fixes that usually solve it.
What causes vertical banding on prints?
Vertical banding on prints usually comes from uneven ink, toner, or paper movement across the page. On an inkjet printer, the most common causes are blocked nozzles, a printhead that needs alignment, or a bad driver setting. On a laser printer, the cause is often the paper feed rollers, toner path, or drum area.
Is banding a printer or driver problem?
It can be either, but the test page tells you which one to chase first. If the printer’s own nozzle check or diagnostic page shows banding, the printer itself is the likely source. If the test page is clean and only files from your computer show banding, the driver or print settings are the better place to look.
Drafted with AI; not yet reviewed by a person.