Last updated: November 18, 2026
How to find a printer’s IP address usually means checking the printer itself, its network settings, your computer, or the router’s client list. If the printer is on the network, one of those four places normally shows it in under 5 minutes. According to Microsoft’s printer troubleshooting guidance, Windows can also expose printer details through its settings and ports, while Apple’s printer setup help shows where macOS stores printer information.
Key takeaways
- The quickest route is often the printer’s own control panel, where the address may appear on a network status or configuration page.
- If the screen is hard to use, the router’s client list or the printer’s settings on Windows or macOS can still reveal the address.
- A missing IP address usually means the printer is offline, using USB only, or not fully joined to the network yet.
- The address can change after a router reboot, DHCP lease renewal, or network reset, so an old label may be wrong.
Find the printer IP address on the printer itself

The printer itself is often the first place to look because many models show the printer IP address on the printer control panel or on a printed network configuration page. On a device with a simple monochrome screen, this takes about 30 seconds; on a touchscreen model, it may take 1 to 2 minutes.
-
Wake the printer and open the printer menu or home screen.
Look for labels such as Network, Wireless, Wi‑Fi, TCP/IP, or Reports. When this works, you will see a menu item for network status, not a print job list. -
Choose the option that prints a network configuration page or network settings page.
Many printers call this Configuration Page, Status Page, or Network Summary. A successful choice sends one page to the output tray with the printer’s network details. -
Read the line labeled IP Address, IPv4 Address, or TCP/IP Address.
The format usually looks like four numbers separated by dots, such as192.168.1.24. That number is the address the printer uses on the local network. -
If there is no IP line, open Wireless Status or Network Status instead.
Some models hide the address one level deeper. If the page shows 0.0.0.0, Disconnected, or Not Connected, the printer does not currently have a valid network address.
This is the method I would try first for a standalone printer, because it avoids computer settings and router logins. It is not the best method if the printer has never appeared on the Mac or the printer has no screen and no way to print a status page; in that case, the computer or router method can be quicker.
How to find a printer’s IP address in Windows
Windows can show the printer IP address in printer properties, usually in a field called Ports. This works best on Windows 10 and Windows 11 when the printer is already installed, and it often takes less than 2 minutes.
-
Open Settings or Control Panel and go to Printers & scanners or Devices and Printers.
You should see the printer listed by name. If it is missing entirely, this method will not help until Windows already knows the device. -
Select the printer, then open Printer properties.
Do not open just the print queue if you can avoid it; you want the settings window with multiple tabs such as General, Ports, and Advanced. -
Open the Ports tab.
A network printer usually shows one checked port, often with a name likeStandard TCP/IP Portor a port beginning withIP_. -
Select the port and choose Configure Port if available.
The port name or configuration window often reveals the printer’s IP address directly. When it works, you will see a numeric address in the192.168.x.xor10.x.x.xrange. -
If the address is not visible on the port, open the printer’s Properties or Web Services link if Windows shows one.
Some drivers provide a button that opens the printer’s embedded web page. That page usually lists the address at the top.
Windows is useful when the printer is stubborn on the panel or when the screen is too small to read. It is less useful for a printer connected only by USB, because a USB connection does not require a network IP address at all.
How to find a printer’s IP address on macOS
macOS can show the printer IP address in the printer’s info panel, usually under the Options & Supplies or Info button. This is a clean route on macOS 13 and later, and it often takes under 1 minute once the printer is already added.
-
Open System Settings and go to Printers & Scanners.
You should see the printer listed on the right. If the printer is not listed, macOS cannot show its IP from this screen yet. -
Click the printer, then open Options & Supplies or Printer Options.
On many models, a tab or button labeled General or Location appears first, with the network details one click deeper. -
Look for Location, Kind, or a field labeled Address.
The printer IP address may appear directly next to Address, especially for a Bonjour or IP printer. If the printer is on the network, the address usually appears as a numeric string rather than a hostname. -
If the panel does not show it, hold Control and click the printer, then choose Open Print Queue or Printer Web Page if offered.
Many printers expose a web page on the local network. If the browser opens, the page often shows the IP address in the header or network summary. -
As a fallback, open Safari and visit the printer’s host name only if you already know it from the printer list.
Do not guess random hostnames; macOS will not resolve them unless the printer is already discoverable on the network.
macOS is often the easiest place to confirm the address after the printer has been added. It is not the best method if the printer has never shown up on the Mac, because then the printer entry may not exist yet.
Use the router admin page when the printer screen is useless
The router admin page can show the printer IP address in the router’s client list, which is especially helpful when the printer has no display or the printer menu is frozen. This method depends on the printer being connected to the same network as the router, and the router page often shows dozens of devices, so the trick is identification.
-
Open a browser and sign in to the router admin page.
Common addresses are192.168.0.1,192.168.1.1, or a custom address printed on the router label. When it works, you will reach a page with settings such as Connected Devices, Attached Devices, or Client List. -
Open the device list.
Look for names that resemble the printer brand, model, or a generic device name withHP,Canon,Brother,Epson, orLexmark. Some routers show the MAC address, which can help distinguish the printer from a phone or laptop. -
Match the printer by its name, vendor, or last-seen time.
If the router shows a hostname likeHP-OfficeJetorEPSON123456, that is likely your printer. The matched row usually includes the IP address in a column beside the name. -
Copy the IP address exactly as shown.
A router list may show the address as part of a longer device summary, and one digit off will point to the wrong device. -
If the printer is absent, refresh the client list after 30 to 60 seconds.
Some routers update slowly. If the printer still does not appear, the printer may be offline, asleep, or not connected to that router at all.
This method is good when the printer’s own controls are awkward or when the computer does not show a clear address. It is not ideal if the router login is unknown, because resetting a router just to read a client list is too much work for a simple lookup.
What to check if the printer has no IP address
A printer with no IP address usually is not on the network yet, is connected by USB only, or has a network fault that prevents it from receiving one. The most common signs are 0.0.0.0, blank network fields, or a status page that says the printer is not connected.
First, check whether the printer is actually on Ethernet or Wi‑Fi rather than USB. A USB-only connection does not create a network IP address, so Windows or macOS may still print to it without showing an address. If the printer is network-capable but still blank, the device may be stuck waiting for DHCP from the router.
Next, print the network configuration page again after a full restart of both the printer and the router. A router reboot often restores address assignment within 1 to 3 minutes, but the printer may need a fresh wake cycle to request a new lease. If the printer is on Wi‑Fi, weak signal can keep it from staying connected long enough to show a stable address.
If the printer menu shows a hostname but no address, that can happen on some models until the network link is active. In that case, the router client list is the better source because it shows what the router assigned. For setup help that is really about getting a printer online in the first place, the hub on printer connectivity and device discovery is the better next stop than chasing the address itself.
A printer IP address is not permanent. Many home routers use DHCP, which means the address can change after a reboot or lease renewal, so an old sticky note on the printer may be wrong even when the printer is working. If the printer still has no IP address after these checks, consult a professional or the printer manufacturer’s support, and follow the network guidance in the RFC 1918 private address space.
Common mistakes that send you to the wrong address
The biggest mistake is confusing a printer IP address with a Wi‑Fi password, MAC address, or serial number. The IP address looks like four numbers with dots; the MAC address usually looks like six pairs of letters and numbers. Mixing them up wastes time and can send you to the wrong device page.
Another mistake is checking only the print queue and assuming that the missing address means the printer has none. In Windows and macOS, the queue can still exist even when the network details live in a separate properties panel. That matters because the port or address field is often the one place where the real value appears.
A third mistake is trusting an old address from a label, note, or previous setup screen. If the router assigned a new lease, the printer may now use a different address. That can happen on networks that restart overnight or on printers that sleep for long periods and reconnect later.
The safe habit is simple: confirm the address in two places if the printer is being stubborn. The printer menu and the router client list usually agree when the network is healthy, and if they do not, the mismatch itself tells you where the problem sits.
The fastest method to try first
The fastest method is the printer’s own network settings page, because it gives you the address without needing the computer to recognize the device. If the printer has no usable screen, the router client list is the next best choice, and Windows or macOS comes after that.
I would start on the printer, then move to the router, then check the operating system only if the first two do not work. That order follows where the data is most likely to exist. It also avoids the mistake of hunting through software when the printer has already printed the answer on a configuration page.
This order is wrong for one narrow case: a USB-only printer that is not on the network at all. In that case, there may be no printer IP address to find, and the real task is deciding whether the printer should be networked in the first place.
Where this fits in the rest of your printer setup
Finding the printer IP address is the discovery step, not the whole setup. Once you have the address, you can open the printer’s web interface, confirm the network status, or share the information with the person who manages the office router. That is why the IP address matters more than the printer name in many networks.
If the printer keeps changing addresses, the router’s DHCP settings or a reserved address may be involved, but that is a separate task from simply finding the current one. For a basic home network, the useful goal is just to get the number from the printer menu, router admin page, or computer settings and stop there.
The cleanest result is a current address that matches the device on screen, in the router list, and on the printed configuration page. When those three line up, you have the right printer and the right number.
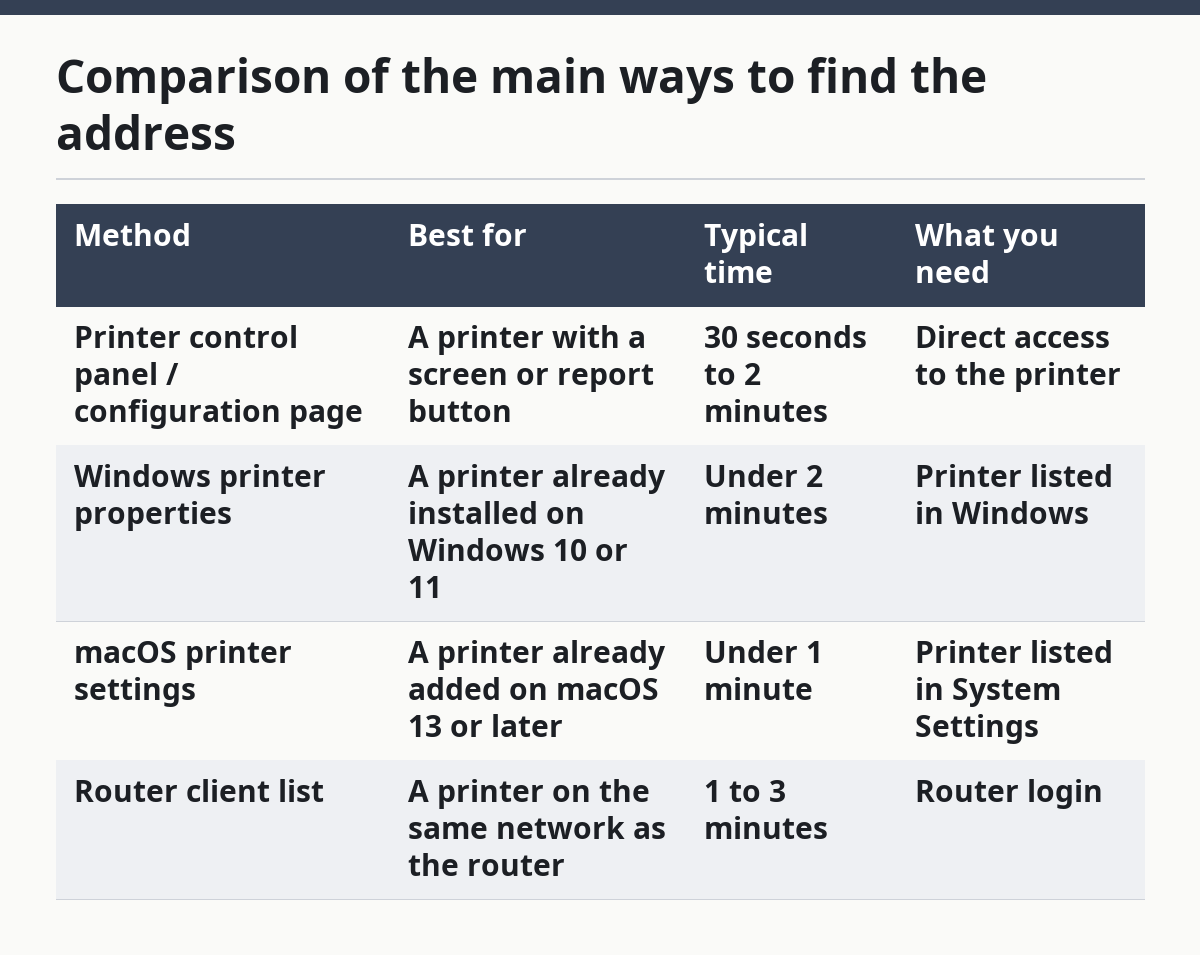
Comparison of the main ways to find the address
| Method | Best for | Typical time | What you need |
|---|---|---|---|
| Printer control panel / configuration page | A printer with a screen or report button | 30 seconds to 2 minutes | Direct access to the printer |
| Windows printer properties | A printer already installed on Windows 10 or 11 | Under 2 minutes | Printer listed in Windows |
| macOS printer settings | A printer already added on macOS 13 or later | Under 1 minute | Printer listed in System Settings |
| Router client list | A printer on the same network as the router | 1 to 3 minutes | Router login |
Where do I find the IP address on the printer itself?
Look for it on the printer’s control panel under Network, Wireless, or Reports. Many printers can print a network configuration page that lists the printer IP address as IPv4 Address or TCP/IP Address. If the printer has a touchscreen, the menu usually takes 1 to 2 taps deeper than the home screen.
What if the printer does not show an IP address?
The printer may not be connected to the network, or it may be using USB only. Try the router client list and the printer’s page in Windows or macOS, because one of those often shows the address even when the printer screen does not. If the page shows 0.0.0.0, the printer has not received a usable network address yet.
Why does the IP address change?
Most home routers hand out IP addresses with DHCP, so the printer can get a different address after a reboot, a lease renewal, or a network reset. That can happen on many networks and does not always mean the printer is broken. The router client list or a fresh configuration page shows the current address, not the old one.
Drafted with AI; not yet reviewed by a person.