Last updated: November 18, 2026
Quick Answer: For most people, the best scanner setup is a flatbed for mixed or fragile originals and a duplex ADF for high-volume office paper, with 300 dpi searchable PDF as the starting point for text documents.
Scanner setup and scanning workflows are mostly about matching the device to the job: photos, documents, receipts, books, or archiving. In this guide to Scanner setup and scanning workflows — The Complete Guide, the right workflow is the one that gives you clean files with the least re-scanning, and that usually means picking the right scanner type, software settings, file format, and naming system before you scan a single page.
Key Takeaways
- Flatbed scanners are the safe default for mixed documents, photos, and anything fragile; sheet-fed scanners win when speed matters more than perfect handling.
- Good scanning starts with the source: dust, curl, glare, and bent pages cause more problems than most software settings do.
- If the end goal is editing text, OCR and searchable PDF matter more than raw resolution.
- If the end goal is archiving, consistent file names, page order, and backup rules matter as much as image quality.
- The “best” setup changes when you scan one page a week, one box of records a month, or hundreds of pages a day.
What Actually Determines the Right Scanner Setup?
The right scanner setup is determined by the material you scan, the speed you need, and how much cleanup you can tolerate later. If you scan photos, thin receipts, or odd-sized paper, a flatbed scanner is often the safest choice. If you scan multi-page office documents all day, a sheet-fed document scanner with an automatic document feeder, or ADF, is the better tool.
The first decision is physical handling. A flatbed keeps the original still and works well for fragile paper, curled receipts, stamps, negatives, and bound pages. A sheet-fed scanner moves paper through rollers and is much faster, but it can misfeed, skew pages, or damage delicate originals. A duplex ADF scans both sides in one pass, which matters when you have 20-page contracts or a stack of invoices.
The second decision is output. If you need a clean archive, a searchable PDF at 300 dpi is usually enough for text documents. If you need editing, OCR software matters more than pushing resolution to extremes. For photos or artwork, 600 dpi or higher can make sense, especially if you may crop later. For tiny receipts, 300 dpi may be acceptable, but higher resolution can help OCR read faded print.
The third decision is workflow speed. A scanner that sounds great on paper can still waste time if its software is clumsy. A good document scanner lets you scan, split, rotate, OCR, rename, and save in one pass. If it cannot do that, the device may be fast while the workflow stays slow.
A practical setup also includes the computer side: the scanner driver, the scanning app, and the destination folder structure. TWAIN and WIA are common Windows driver standards; on Mac, many scanners work through Image Capture or vendor software. If the scanner only works through a bloated proprietary app, that can become the bottleneck.
| Situation | Best Path | Why Other Options Fail |
|---|---|---|
| Mixed documents and photos | Flatbed scanner with 300–600 dpi workflows | ADF rollers can damage originals and misfeed odd sizes |
| Large stacks of office paper | Duplex ADF document scanner | Flatbeds are too slow for batch work |
| Fragile books or bound records | Flatbed or overhead scanner | Sheet-fed scanners flatten and stress the original |
| Receipts and small slips | Flatbed or receipt-capable sheet-fed scanner | Cheap phone apps often struggle with glare and curled edges |
| Searchable records archive | OCR to searchable PDF, 300 dpi text scans | High-resolution images alone waste storage and don’t help search |
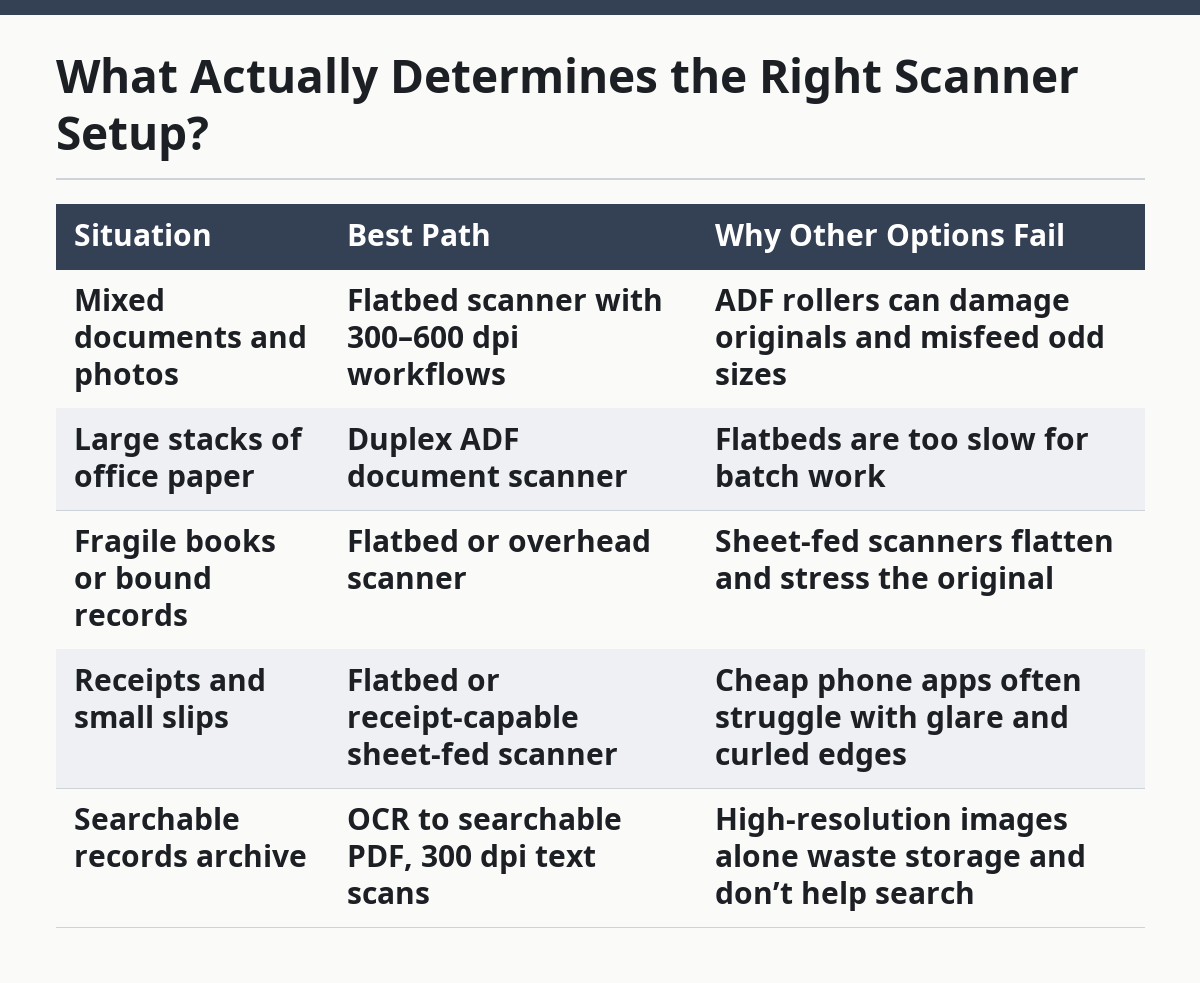
If you want the shortest answer: choose a flatbed if originality matters, choose an ADF if volume matters, and choose OCR if search matters. Quick check: if you already know the paper is delicate or the pile is large, the setup choice is probably decided for you.
How do I set up a scanner for the first time?
You set up a scanner by installing the right driver, choosing a stable place for the device, confirming feed or glass quality, and saving a known-good profile before you scan anything important. If you skip the first profile, you end up redoing the same settings every session and guessing at file quality later.
Start with placement. A flatbed scanner needs a clean, level surface with enough space for the lid to open fully. An ADF scanner needs room behind it for output pages and room in front for the paper input tray. If the scanner sits on a vibrating or cramped shelf, paper feed errors go up and you will hate the workflow by page 40.
Then install the driver. Many scanners work best with the vendor’s driver package rather than a generic system driver. On Windows, that often means checking whether the device uses TWAIN or WIA support; on business scanners, TWAIN is common in third-party apps. On macOS, some scanners are easy through Image Capture, but high-end document scanners may still need vendor software for duplex, blank-page removal, or OCR profiles.
Next, create one baseline scan profile. Set paper size, color mode, resolution, output folder, and file type. For standard office pages, a practical baseline is 300 dpi, grayscale or black-and-white depending on the source, and searchable PDF if the text needs to be found later. For photos, pick TIFF or high-quality JPEG if you need image fidelity. Save the profile with a plain name such as “Invoices 300 dpi PDF” or “Photos 600 dpi TIFF.”
Now check the scanner glass or rollers. Dust on a flatbed shows up as spots and streaks. Worn rollers in an ADF cause skewed pages, double feeds, and paper jams. If the scanner has a separation pad or roller-cleaning reminder, use it. That is not optional maintenance; it is part of setup.
Finish with a test run of 3 to 5 pages. Include a page with text, a page with light shading, and one page with a photo or stamp if you expect those later. It is usually enough to confirm that the scan is readable at 100% view and that OCR can find words from the text page. If the file is too large, too soft, or cropped, adjust before you batch scan 200 pages.
- Install the vendor driver or scanning app for your operating system.
- Place the scanner on a flat, stable surface with enough room for input and output.
- Clean the glass, lid backing, rollers, and feed path before first use.
- Create one default profile with the correct paper size, dpi, file type, and destination folder.
- Run a test scan using 3 to 5 representative pages.
- Check crop, skew, contrast, and OCR accuracy before scanning the full batch.
If you need a name to look for in scanner software, Adobe Acrobat, VueScan, NAPS2, Epson Scan 2, Canon IJ Scan Utility, Brother iPrint&Scan, and Fujitsu/Ricoh ScanSnap software are all common in real workflows. They are not interchangeable, and a cheap scanner bundled with weak software can be slower than a better one with sane presets. Quick check: if you have not built a saved profile yet, you are not set up—you are improvising.
What scanning settings should you actually use?
You should use the lowest setting that preserves the information you need, because higher settings increase file size, slow OCR, and make cleanup harder. If your scan is for text search and office archive use, 300 dpi is usually the first setting to try. If the document includes tiny print, faded carbon copies, or detailed line art, raise it to 400 or 600 dpi. If you are scanning photos, 600 dpi is often a more useful floor than 300 dpi, especially when cropping later.
Color mode is the next decision. Black-and-white is best for plain text on clean paper when file size matters most. Grayscale is safer for mixed documents, stamps, signatures, light pencil marks, and uneven paper tone. Color is necessary when color carries meaning, such as highlights, annotations, receipts with color logos, or archival records where the hue itself matters.
File type matters just as much. PDF is the standard for multi-page documents because it keeps pages together and is easy to search when OCR is applied. JPEG is fine for photos and simple image sharing, but repeated saving can degrade quality. TIFF is better for preservation and editing, though files are larger. If the goal is long-term archive storage, TIFF or PDF/A may be worth considering; PDF/A is an archival variant designed to preserve document appearance and metadata.
Automatic settings can help, but only when they behave predictably. Auto-exposure, auto-deskew, blank-page removal, and auto-rotate are useful on business documents. On mixed originals, the same tools can cut off signatures, misread orientation, or remove pages that look blank but contain light pencil notes.
The usual beginner mistake is chasing a higher dpi number instead of fixing the source. A 600 dpi scan of a wrinkled, dusty page is still usually a poor page. Flatten the original, clean the glass, and make sure the scanner bed is aligned before changing resolution. That saves more time than moving from 300 to 1200 dpi.
If you use OCR, run it after the scan, not before. OCR works best when text is sharp, upright, and uncluttered. For languages with special characters, confirm the OCR engine supports them. Tesseract, ABBYY FineReader, and Adobe Acrobat all support OCR, but they do not behave identically.
Quick check: if your documents are mostly typed and clean, 300 dpi grayscale searchable PDF is probably enough; if they are tiny, fragile, or image-heavy, your settings need to shift.
Which scanning workflow fits your job?
The right workflow depends on whether you need speed, preservation, or searchable files, and those three goals do not always line up. If you care most about speed, you batch scan in one sitting and let the software do the sorting. If you care most about preservation, you slow down, inspect each item, and avoid aggressive cleanup. If you care most about search, OCR and file naming become the center of the process.
A small-home workflow is usually simple: scan, review, name, save, back up. That works for warranties, tax papers, medical statements, school forms, and a few photos. A larger office workflow needs more structure: paper prep, batch scanning, separator sheets, OCR, review queue, and file routing to the correct folder or case. The more people touch the process, the more important standard names and fixed settings become.
For one-off personal scanning, a flatbed plus a simple app like NAPS2 can be enough. NAPS2 is popular because it supports profiles, OCR, PDF output, and batch scanning without too much noise. For recurring office use, a document scanner with duplex ADF and software that supports split documents, barcode recognition, and destination rules saves real time. For archival imaging, overhead scanners or book scanners may be worth the extra cost because they reduce spine stress.
A workflow also needs a decision about page separation. If you scan multiple documents in one run, you need a way to split them later. That can be done with separator sheets, barcode sheets, file naming rules, or manual splitting in Acrobat or another PDF editor. Without a separation plan, the pile becomes one giant file and the cleanup eats the afternoon.
Here is a practical office-style path for a 50-page stack of invoices:
- Sort the paper into one document type and remove staples, clips, and sticky notes.
- Confirm the scanner profile is set to duplex, 300 dpi, grayscale, searchable PDF.
- Load the stack in page order and scan the full batch in one pass.
- Review the PDF for blank pages, misfeeds, rotation errors, and missing backsides.
- Run OCR and verify that line items, invoice numbers, and dates are searchable.
- Rename the file with a consistent pattern, such as vendor-date-document type.
- Move the file to the right folder and back it up to a second location.
The workflow breaks when the scanner is faster than the review stage. That is common with high-speed ADF models that can process dozens of pages per minute. If you skip quality checks, you end up archiving garbage at high speed, which is not efficiency.
Quick check: if your main pain is “I scan things and then can’t find them,” the fix is probably workflow structure, not a new scanner.
How should I scan books, receipts, photos, and fragile pages?
You should use different methods for each material, because one scan path does not fit all originals. If you force books, glossy photos, and thermal receipts through the same setting, one of those formats will suffer.
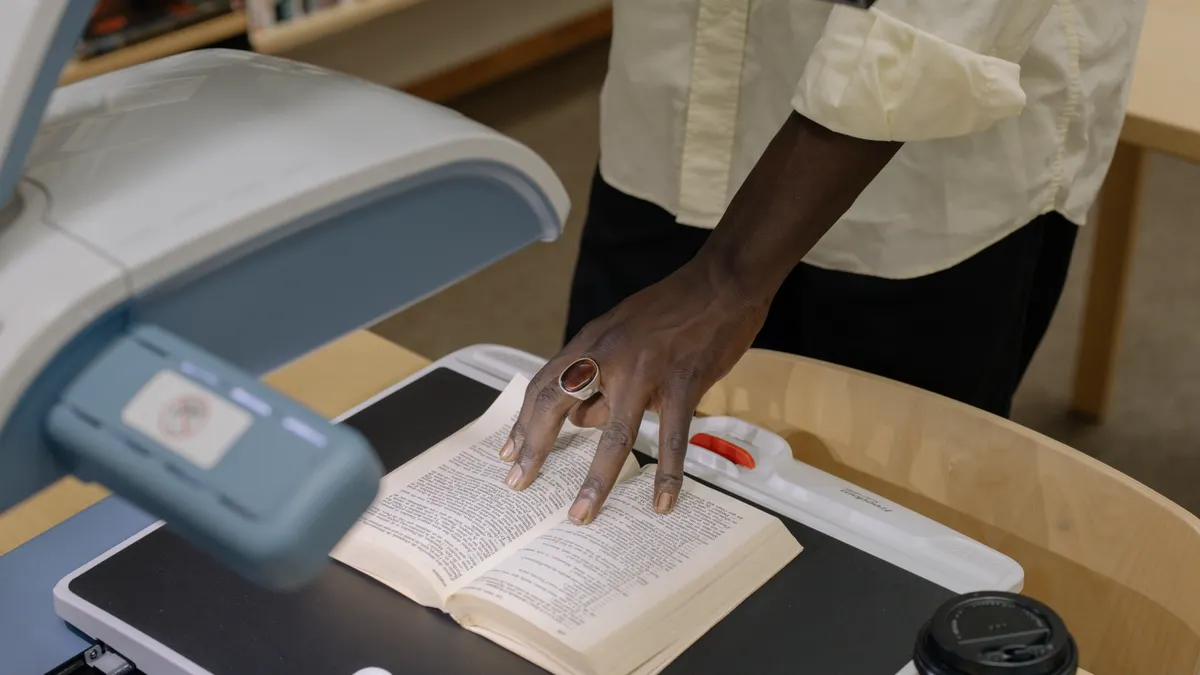
Books are the hardest common case. If the binding opens flat without stress, a flatbed can work page by page. If the spine resists or the book is valuable, an overhead scanner or book cradle is the better path because it reduces pressure on the binding. For curved pages, use gentle pressure only if the book can tolerate it. Cutting the spine for batch ADF scanning is fast, but it is irreversible and wrong for most library, personal, and archival material.
Receipts are tricky because thermal paper fades and curls. Use the lowest contrast setting that still keeps the print readable, and scan soon if the receipt matters for reimbursement or records. A flatbed often gives cleaner results than a phone camera when the receipt is curled or printed on shiny paper. If the receipt is tiny, 300 dpi can be the minimum; if the print is faint, 400 or 600 dpi may help OCR catch the text.
Photos need more care with color and tone. Scan at a higher resolution if you expect to crop, restore, or print later. Use color even for black-and-white prints if the original paper tone, annotations, or border markings matter. Keep sharpening light. Over-sharpened photos create halos and grain that are hard to remove later.
Fragile pages, stamps, and historical documents should be handled like originals, not like copier paper. A flatbed gives you control and reduces transport risk. If the item is brittle, torn, or has flaking media, do not feed it through rollers. The small time saved is not worth the damage.
If you are scanning mixed materials in one archive project, separate them by type before starting. That may mean one profile for photos, one for text documents, and one for book pages. It sounds slower, but it avoids a folder full of files that all need different cleanup later.
Quick check: if the material bends, curls, fades, or carries visual detail beyond plain text, slow the process down and use the gentlest setup available.
When the standard advice is wrong
The standard advice is wrong when your scanner is fast but your original is fragile, your paper is clean but your OCR is bad, or your archive needs proof-quality images rather than convenient PDFs. In those cases, the “just scan at 300 dpi” answer is incomplete.
If you are scanning archival records, legal exhibits, or anything that may need evidentiary value, preservation matters more than convenience. That usually means careful handling, complete metadata, consistent naming, and an output format that will survive future access. Standards such as PDF/A are often discussed for archival documents because they reduce the risk of missing fonts or broken links, but document-retention rules can vary by organization and jurisdiction, so check policy with the relevant records or legal professional.
If you are scanning a photograph collection, JPEG-only workflows can be a trap. JPEG is fine for sharing, but repeated edits and resaves can degrade image quality. A TIFF master and a smaller JPEG copy is a better split in many photo workflows. The master preserves more information; the smaller copy is for quick use.
If you are scanning lots of handwritten notes, OCR may disappoint. Handwriting recognition exists, but performance varies widely with script, language, and image quality. In that case, scan for legibility and indexing first, not for perfect search. A well-named PDF may be more reliable than a search system that misreads every page.
If you are using a shared office scanner, the problem may be the queue, not the hardware. A great scanner in a bad workflow still creates jams, misrouted files, and duplicated work. The fix is usually a locked profile set, clear naming rules, and someone responsible for final review.
If your pages are skewed or clipped on every scan, do not keep increasing resolution. Check the paper guides, the roller path, the lid alignment, and the paper stack itself. Hardware alignment problems will not be fixed by software.
A useful rule: if the goal is proof, preservation, or legal recordkeeping, convenience gets demoted. Quick check: if a bad scan could create a real downstream problem, treat the workflow as controlled document capture, not casual digitizing.
What maintenance keeps a scanner reliable?
Regular cleaning, roller replacement, and software updates keep a scanner reliable longer than most settings changes do. If you wait until every page jams or every scan streaks, the workflow is already failing.
On flatbeds, the glass and white backing strip need cleaning with a lint-free cloth and a cleaner approved by the manufacturer. Fingerprints and dust show up as spots on every page. On ADF scanners, the feed rollers and separation pad wear out over time. Many business scanners include a maintenance counter or feed-parts replacement schedule; follow it instead of guessing.
Software matters too. Scanning software updates often fix driver issues, OCR bugs, and compatibility problems after operating system changes. If your scanner worked last year and now behaves strangely after an OS upgrade, the driver version is one of the first places to look.
Keep the environment sane. High humidity can make paper cling and feed poorly. Too much dust makes glass dirty faster. Heat can affect thermal receipts and some originals. A scanner shoved next to a printer exhaust or on a shaky shelf will usually age badly.
It also helps to store profiles and presets outside memory when possible. If the software is reset or the machine is replaced, rebuilding ten profiles from scratch is unnecessary pain. Export them if the app allows it.
For standards-minded workflows, check guidance from the International Organization for Standardization for image quality and document imaging terms, and from Adobe’s PDF/A documentation for archival PDF practices. These are not magic fixes, but they give you language and targets that outlast one scanner model.
Quick check: if your scans are getting worse over time, the likely cause is maintenance, not a mysterious software bug.
Can I use phone scanning apps instead of a scanner?
Yes, for light use, but a phone app is not a full replacement when accuracy, speed, or repeatability matters. If you only need to capture a receipt, sign a form, or save a one-page note, a modern phone camera and scanning app can be enough. If you need hundreds of pages, batch OCR, or archival quality, a dedicated scanner wins.
Phone scanning is limited by lighting, perspective, hand shake, lens distortion, and page curl. Apps can correct some of that, but they cannot make a wrinkled, glossy, shadowed page into a clean capture as reliably as a flatbed can. If you are scanning glossy receipts or pages with fine print, the camera often struggles with glare and uneven focus.
A scanner is also better at repeatability. If you need every page to be the same size, same contrast, same rotation, and same file naming pattern, hardware built for scanning is easier to control. That is why office workflows still use document scanners even though phones are everywhere.
That does not mean phone apps are weak. For fast one-offs, they are often the most practical option. Apple Notes, Microsoft Lens, Adobe Scan, and Google Drive scanning features all make casual capture easy. The limitation is not whether they work at all; it is whether they fit a process that depends on consistency.
A good rule is simple: use a phone when the document is short-lived or low stakes, and use a real scanner when you care about the record staying readable later. Quick check: if you would be upset by a skewed edge, missed back side, or poor OCR, do not make the phone your primary workflow.
FAQs
What is the best scanning resolution for documents?
300 dpi is the usual starting point for standard text documents. It gives OCR software enough detail to read most clean print without making files unnecessarily large. If the print is tiny, faded, or dense, 400 to 600 dpi can help, but higher resolution is not a cure for dirty glass or wrinkled paper.
Should I scan in color, grayscale, or black and white?
Color is best when the color itself matters, grayscale is best for mixed text and light markings, and black and white is best for clean, plain text when file size matters most. If you are unsure, grayscale is often the safest middle ground because it preserves more visual detail than pure black and white.
What file format should I save scans in?
PDF is the best all-purpose choice for multi-page documents, especially when you want OCR and easy sharing. TIFF is better for preservation or editing because it keeps more image data, but the files are larger. JPEG works well for photos and quick sharing, but it is not ideal as the only archival copy.
Do I need OCR on every scan?
No, OCR is only useful when you need the text to be searchable or copyable. If you are archiving photos, drawings, or records where text search does not matter, OCR may add time without much benefit. For contracts, invoices, and forms, OCR is worth the extra step.
Is a duplex ADF scanner worth it?
Yes, if you scan two-sided pages regularly or handle moderate to high document volume. A duplex ADF saves time because it captures both sides in one pass and reduces manual page flipping. It is not the right choice for fragile originals, but it is usually the best tool for office paper workflows.
Drafted with AI; not yet reviewed by a person.