Last updated: November 18, 2026
Quick Answer: In most cases, printer setup on Windows and Mac takes a few minutes: add the printer, let the system load the right printer driver if it can, and print a test page.
Printer setup for how to set up a printer on Windows and Mac is straightforward once you know whether the printer will connect by USB cable or over Wi‑Fi. On both Windows and macOS, the basic job is the same: add the printer, let the system load the right printer driver if it can, and print a test page.
Key takeaways
- USB setup can be the simplest path if the printer is beside the computer and you want to skip network steps.
- Wireless setup is better when the printer will be shared by a laptop, desktop, or several people on the same network.
- Windows usually adds printers from Settings > Bluetooth & devices > Printers & scanners; macOS usually uses System Settings > Printers & Scanners.
- If the printer appears but will not print, the first thing to check is the default printer and the connection type, not the paper tray.
- A test page tells you whether the printer is installed correctly before you start fixing deeper problems.
What you need before you start printer setup
Printer setup goes fastest if you have the printer model, a 1- to 2-meter USB cable if you are using a wired connection, and access to the same Wi‑Fi network the printer should use. If the printer came with a setup sheet or a QR code card, keep that nearby too, because many models use it to finish the first pairing.
The one thing that trips people up most is expecting the computer to guess everything. It often can, but only if the printer is already powered on and ready to respond. Turn the printer on first, clear any paper jams or low-ink alerts on the printer screen, and wait until the startup lights stop blinking. That usually takes less than a minute.
This guide is for the first installation only. It is not the right page for deeper problems such as printer driver installation, a printer that shows as offline after setup, or a stuck queue. Those are separate jobs with separate fixes. If you are still choosing a device, the printer buying guide on this site is the better place to compare USB, Wi‑Fi, and duplex features before you buy.
One more practical point: if you have a work laptop with managed settings, the company may restrict printer access. In that case, the setup steps still look the same, but the computer may need admin permission before it accepts the printer driver.
Should I set up the printer with USB cable or Wi‑Fi?
USB cable is the simplest choice if the printer sits next to one computer, while Wi‑Fi is better if you want the printer to stay in one place and be available to more than one device. The right answer depends on distance, convenience, and whether the printer needs to move between rooms.
USB setup has one clear advantage: it avoids network setup during installation. Plug the cable into a USB-A or USB-C port, and the computer often recognizes the printer within a minute or two. That makes USB the safer choice for older printers, small home offices, and anyone who just wants to print a document today without changing router settings.
Wi‑Fi setup trades simplicity for flexibility. Once the printer is on the network, a Windows PC, a MacBook, and often phones or tablets can all send jobs to it. The downside is that first-time setup depends on a stable router, the correct network name, and a printer that can join that network cleanly. If the printer uses only 2.4 GHz Wi‑Fi, that can matter too, since some printers will not join a 5 GHz-only network.
A practical rule helps: choose USB if the printer will stay with one desktop and you want a quick first print. Choose Wi‑Fi if the printer will live across the room, in another office, or in a shared space. A printer that supports both is the most forgiving option, because you can start with USB and move to wireless later if needed.
How do I add a printer on Windows 11?
You add a printer on Windows 11 from Settings > Bluetooth & devices > Printers & scanners, then choose Add device and follow the prompts. If Windows does not find the printer automatically, add it by cable first or select the option for a printer I want isn’t listed.
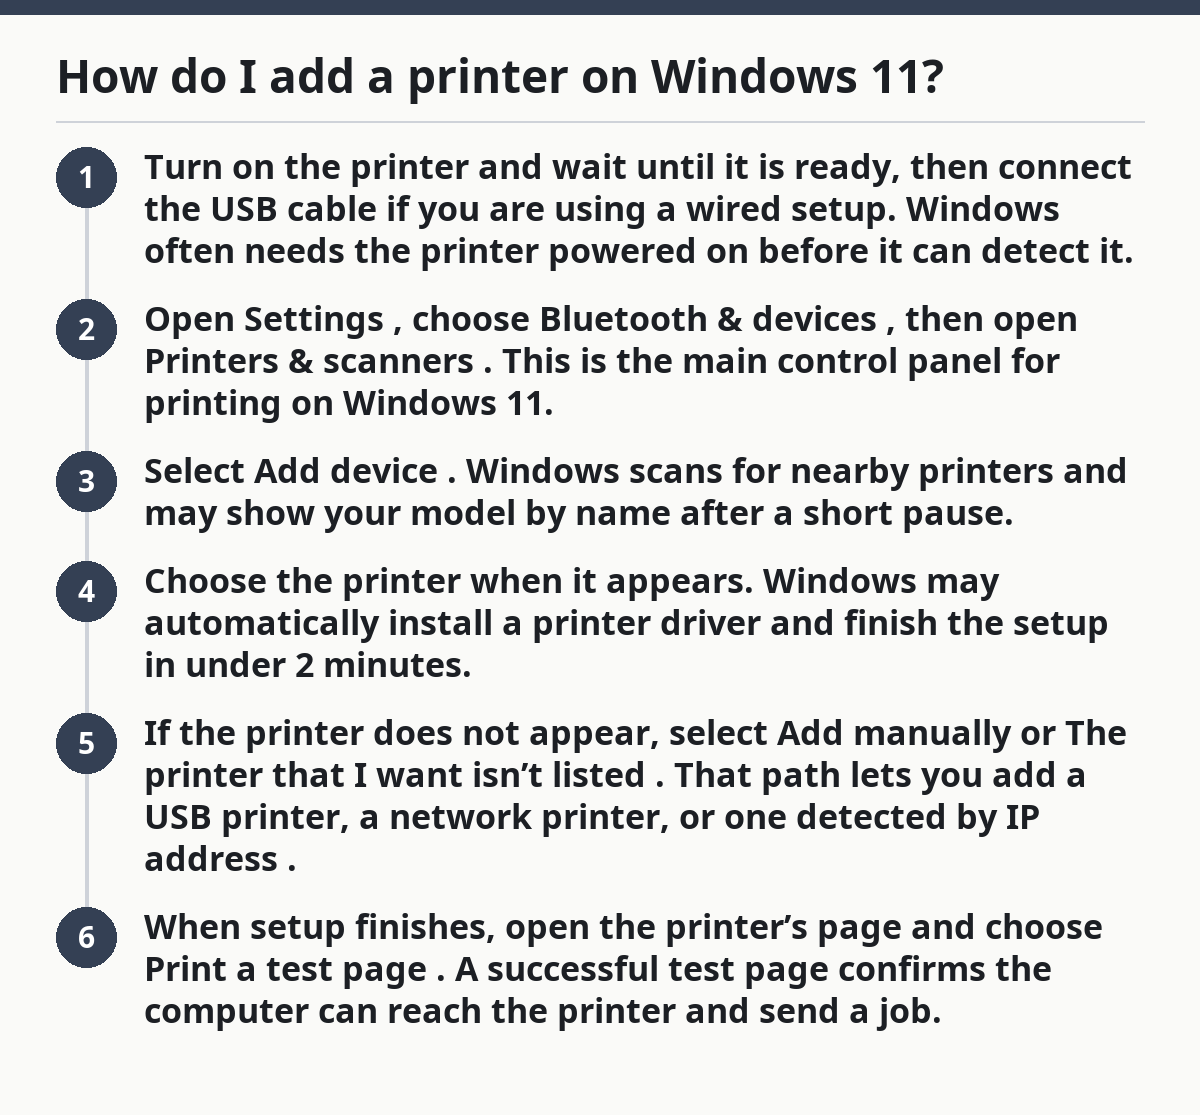
Here is the basic path for most Windows 11 setups:
- Turn on the printer and wait until it is ready, then connect the USB cable if you are using a wired setup. Windows often needs the printer powered on before it can detect it.
- Open Settings, choose Bluetooth & devices, then open Printers & scanners. This is the main control panel for printing on Windows 11.
- Select Add device. Windows scans for nearby printers and may show your model by name after a short pause.
- Choose the printer when it appears. Windows may automatically install a printer driver and finish the setup in under 2 minutes.
- If the printer does not appear, select Add manually or The printer that I want isn’t listed. That path lets you add a USB printer, a network printer, or one detected by IP address.
- When setup finishes, open the printer’s page and choose Print a test page. A successful test page confirms the computer can reach the printer and send a job.
Two details matter here. First, Windows 11 sometimes creates a printer entry before the setup is truly complete, so wait for the status to settle before you try a document. Second, if you are installing through USB, use the cable that came with the printer if possible; some cheap replacement cables carry power but not a reliable data signal.
If the printer lands on the list but gives you the wrong name, that is usually not a disaster. Windows often identifies the device by a broad model family rather than the exact retail label. What matters is whether the test page comes through. If it does, the setup is done.
How do I add a printer on Mac?
You add a printer on Mac from System Settings > Printers & Scanners, then click Add Printer, Scanner, or Fax and choose the device from the list. macOS usually finishes the job automatically if the printer is on the same network or connected by USB.
Here is the cleanest way to do it:
- Turn on the printer and, if needed, attach the USB cable directly to the Mac. A direct connection is often the easiest path for first setup.
- Open System Settings, then go to Printers & Scanners. On older macOS versions, the same area sits inside System Preferences.
- Click Add Printer, Scanner, or Fax. The Mac scans for nearby devices and network printers.
- Select the printer from the list. macOS usually chooses the right printer driver automatically, or it may show AirPrint if the printer supports it.
- Check the Use field before adding the printer. If macOS proposes a generic or incorrect option, change it to the specific printer if the correct name is available.
- After the printer appears in the list, open it and choose Open Print Queue, then send a Print Test Page or a simple one-page document.
The main trap on Mac is assuming every listed printer is ready to use just because it appears. Some models show up before the right driver is loaded, especially if macOS is still deciding between AirPrint and a vendor-specific driver. If the printer name looks right but the page does not print, remove the printer and add it again with the proper “Use” option selected.
Another Mac-specific detail: a printer can appear twice, once as an AirPrint device and once as a manufacturer model. The AirPrint path is often the easiest if the printer supports it, because it relies on a standard built into macOS rather than a separate vendor package.
What to check if the printer appears but still will not print
The default printer, connection type, and test page are the first three things to check when a printer shows up but nothing comes out. This is the point where many people start reinstalling software too soon, when the problem is usually a simple mismatch.
Start with the default printer. On both Windows and Mac, the system may be sending jobs to a different device, even if the new printer is installed correctly. Open the printer list, pick the printer you just added, and set it as the default if that is the one you want to use most often. On a single-printer setup, this removes a lot of confusion.
Next, check the connection. A USB printer should be plugged directly into the computer, not through a dock or a loose hub if you can avoid it. A wireless printer should be on the same network as the computer, and the computer should still be on that network. If the printer disappeared after you moved the laptop to another room, the setup may be fine and the network path may be the real issue.
Finally, print a test page or a single-page text file. That usually separates setup problems from document problems. If a test page works, the printer is set up correctly and the issue is usually inside the app you were trying to print from. If the test page fails, the printer is not fully installed yet.
One common mistake is mixing up “installed” with “ready.” A printer can show in the device list and still be missing its final driver handoff. Another is plugging in a USB cable after trying to add the printer over Wi‑Fi, then assuming the system will switch automatically. In many cases it will not. Pick one setup path first, finish it, and then change to the other only if you need to.
How do I make a printer the default and print a test page?
You make a printer the default from the printer list, then send a test page from that same screen to confirm setup in under a minute. That two-step check gives a reliable sign that Windows or macOS can talk to the printer correctly.
On Windows 11, open Settings > Bluetooth & devices > Printers & scanners, select the printer, and choose Set as default if that option is shown. Windows can also manage the default automatically based on your location or recent use, so if the wrong printer keeps taking over, turn off that behavior and set the printer manually.
On macOS, open System Settings > Printers & Scanners, choose the printer, and set it as the default if another printer is selected. macOS usually uses the first printer you add or the one you last used, which is convenient until you have two or three printers on the same desk.
For the test page, use the printer’s built-in option if the operating system offers it. If not, print a simple one-page document with plain text and no special fonts. A test page should come out with readable text, the correct paper size, and no obvious missing lines. That tells you the printer path is working end to end.
If the page prints but looks wrong, stop and inspect the basics before changing drivers. Paper size set to A4 instead of Letter, or Letter instead of A4, can make a working setup look broken. A correct first page is the finish line for setup, not the start of troubleshooting.
When should you stop and try a different setup path?
You should switch from Wi‑Fi to USB, or from USB to Wi‑Fi, if the printer cannot be detected after a few minutes and the computer keeps returning to the same dead end. At that point, changing the connection method is often faster than repeating the same failed scan.
A good rule is to give one setup path one clean attempt. If you are trying USB, use a known-good cable and a direct port on the computer. If you are trying Wi‑Fi, make sure the printer is powered on, the network is the correct one, and the computer is on the same network. If the printer still will not appear after that, the other path may be easier for first installation.
This is not the time to chase every possible problem at once. Deep fixes such as driver replacement, network repair, or queue cleanup belong on separate pages because they depend on which part of the setup failed. For a first install, the goal is simple: get one working connection, one default printer, and one successful test page.
That is also why this guide stops short of telling you to troubleshoot an “offline” printer or to rework the print queue. Those problems can look similar on the surface, but they are different from setup. If a printer has never printed successfully on this computer, simplifying the setup is usually the best move.
How do I add a printer on Windows 11?
You add a printer on Windows 11 through Settings > Bluetooth & devices > Printers & scanners. Click Add device, wait for the list to refresh, and choose the printer when it appears. If it does not show up, try the USB cable first or use the manual add option.
How do I add a printer on Mac?
You add a printer on Mac from System Settings > Printers & Scanners. Click Add Printer, Scanner, or Fax, select the printer, and check that the Use field matches the right model or AirPrint option. Then print a test page to confirm the setup completed.
Why is my printer not found during setup?
The printer is usually not found because it is off, disconnected, on the wrong network, or waiting for the wrong cable path. Turn it on, use a direct USB connection if you are setting up by cable, and make sure the Mac or Windows PC is on the same Wi‑Fi network if you are setting it up wirelessly. If it still does not appear, switch setup methods once before assuming the printer is faulty.
Drafted with AI; not yet reviewed by a person.